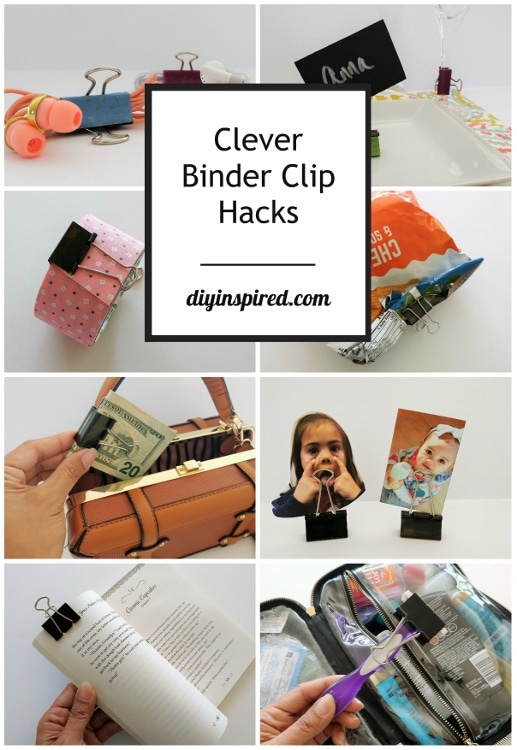
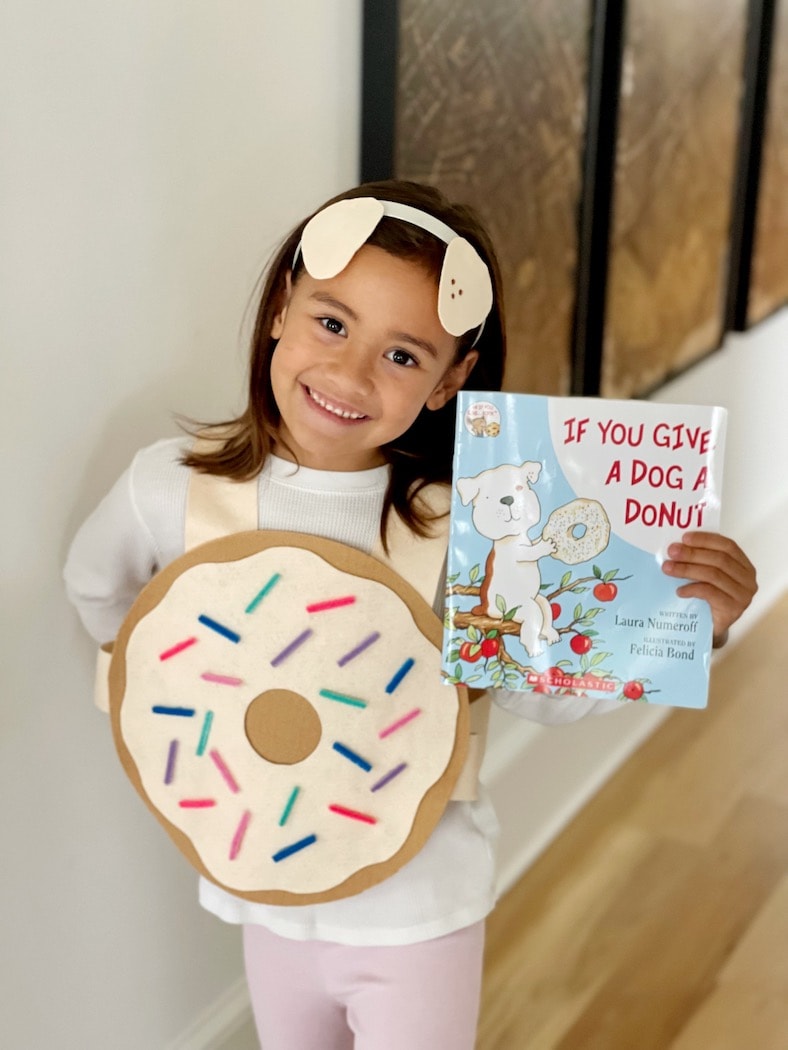
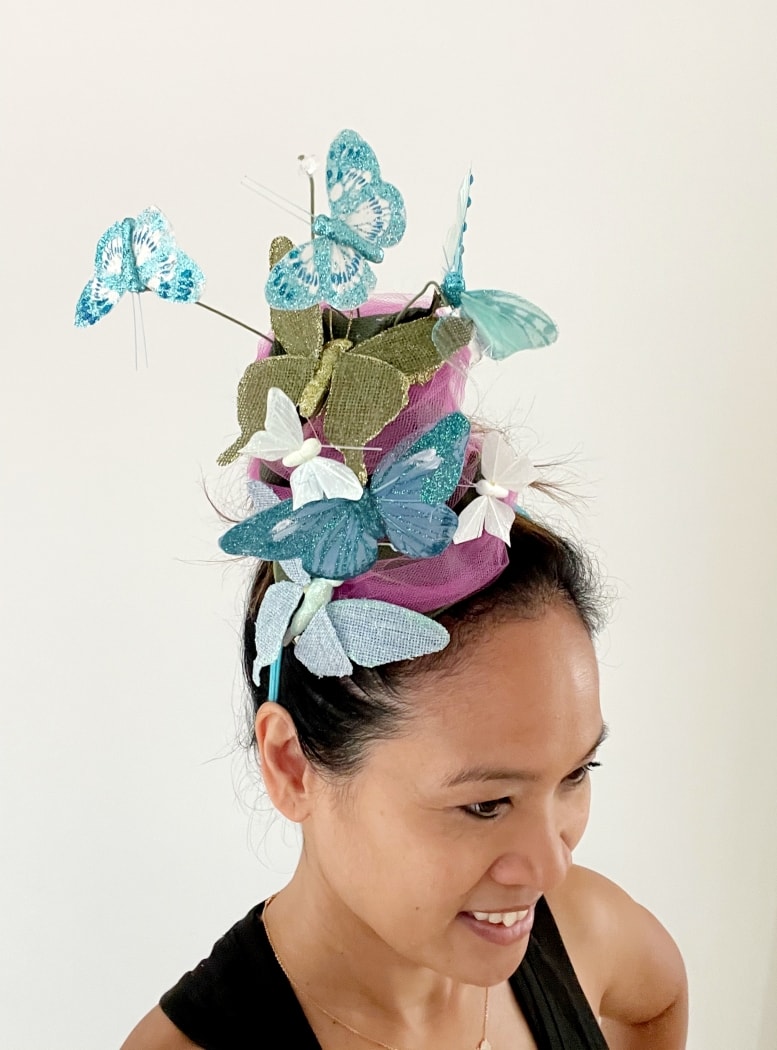
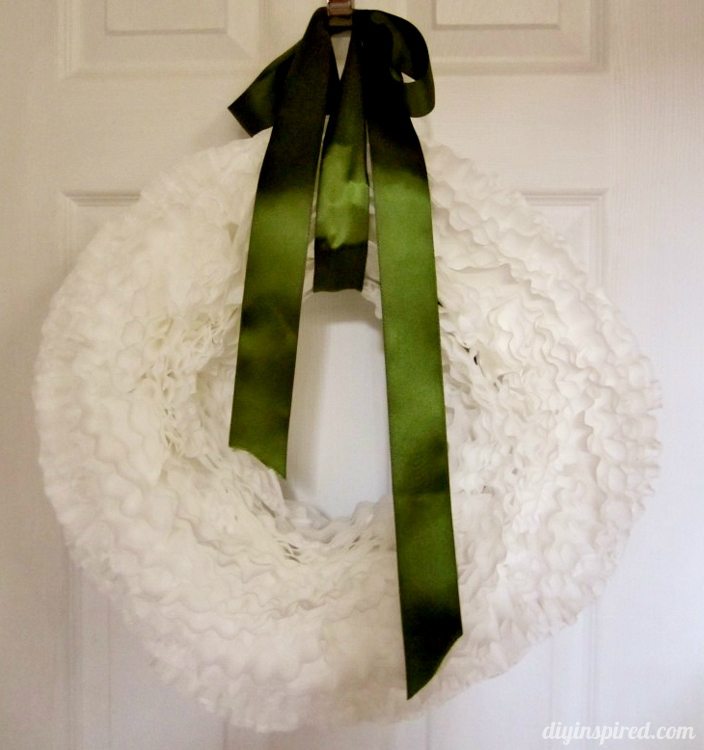
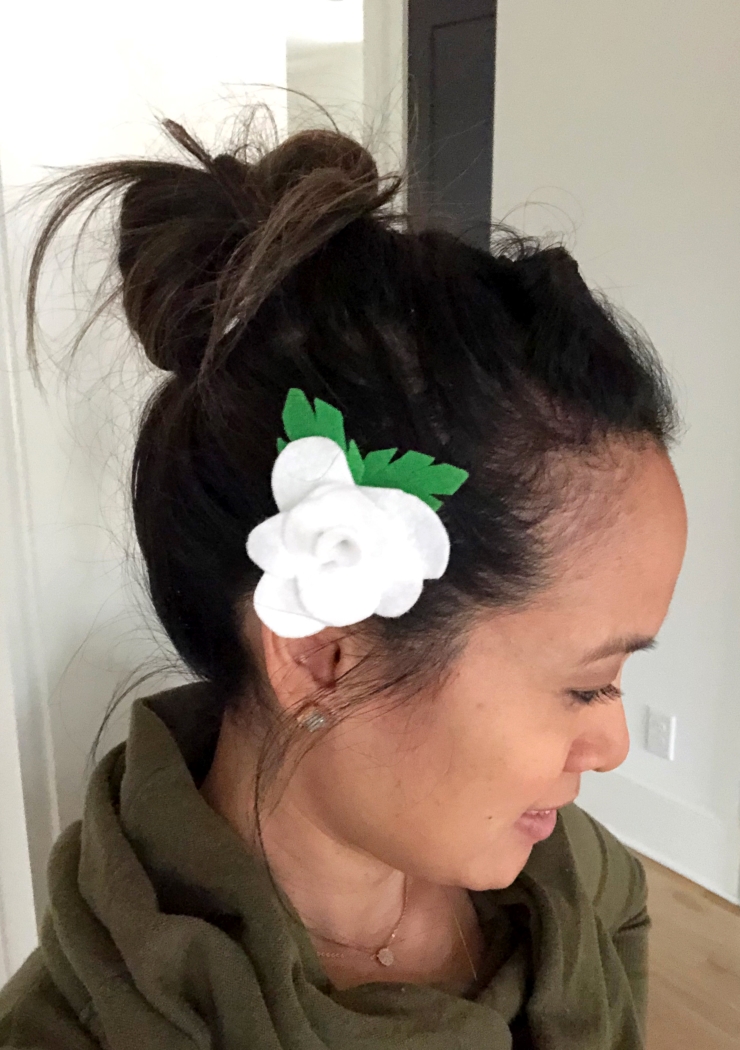
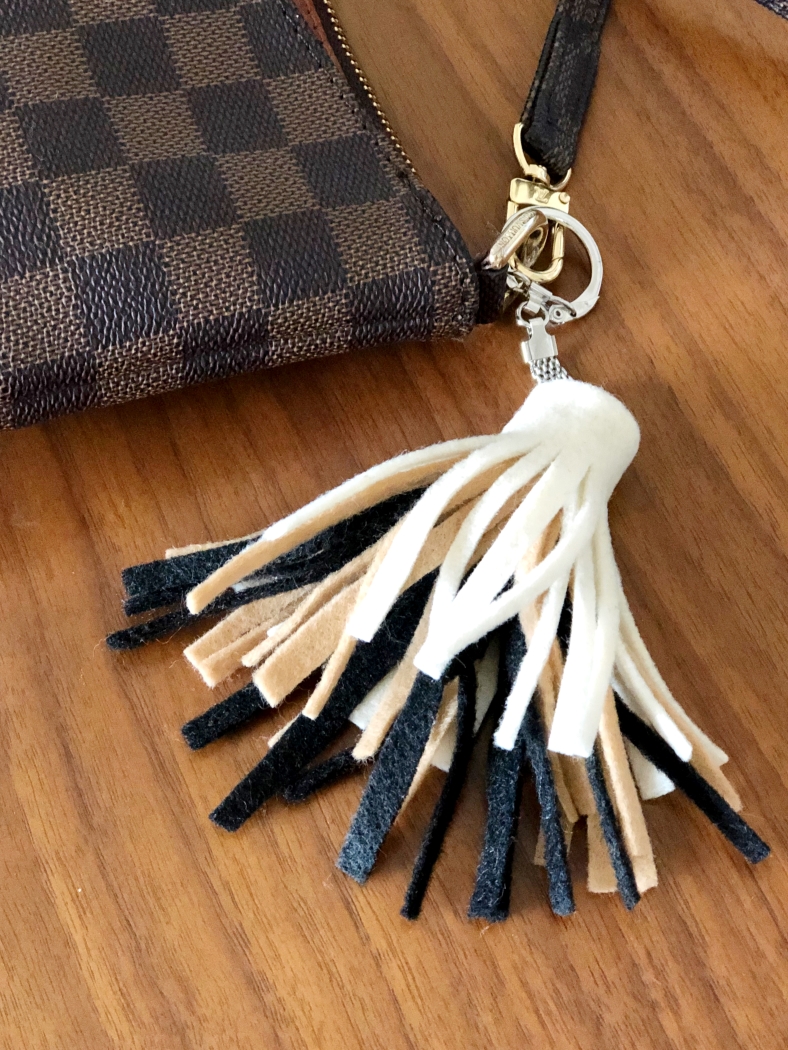
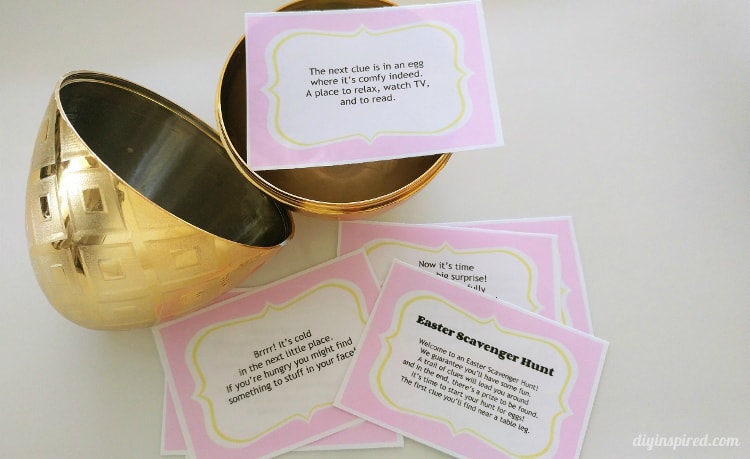
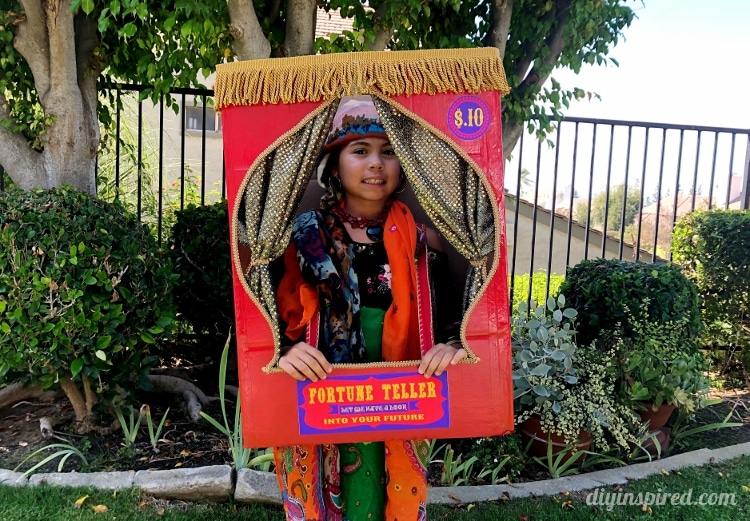
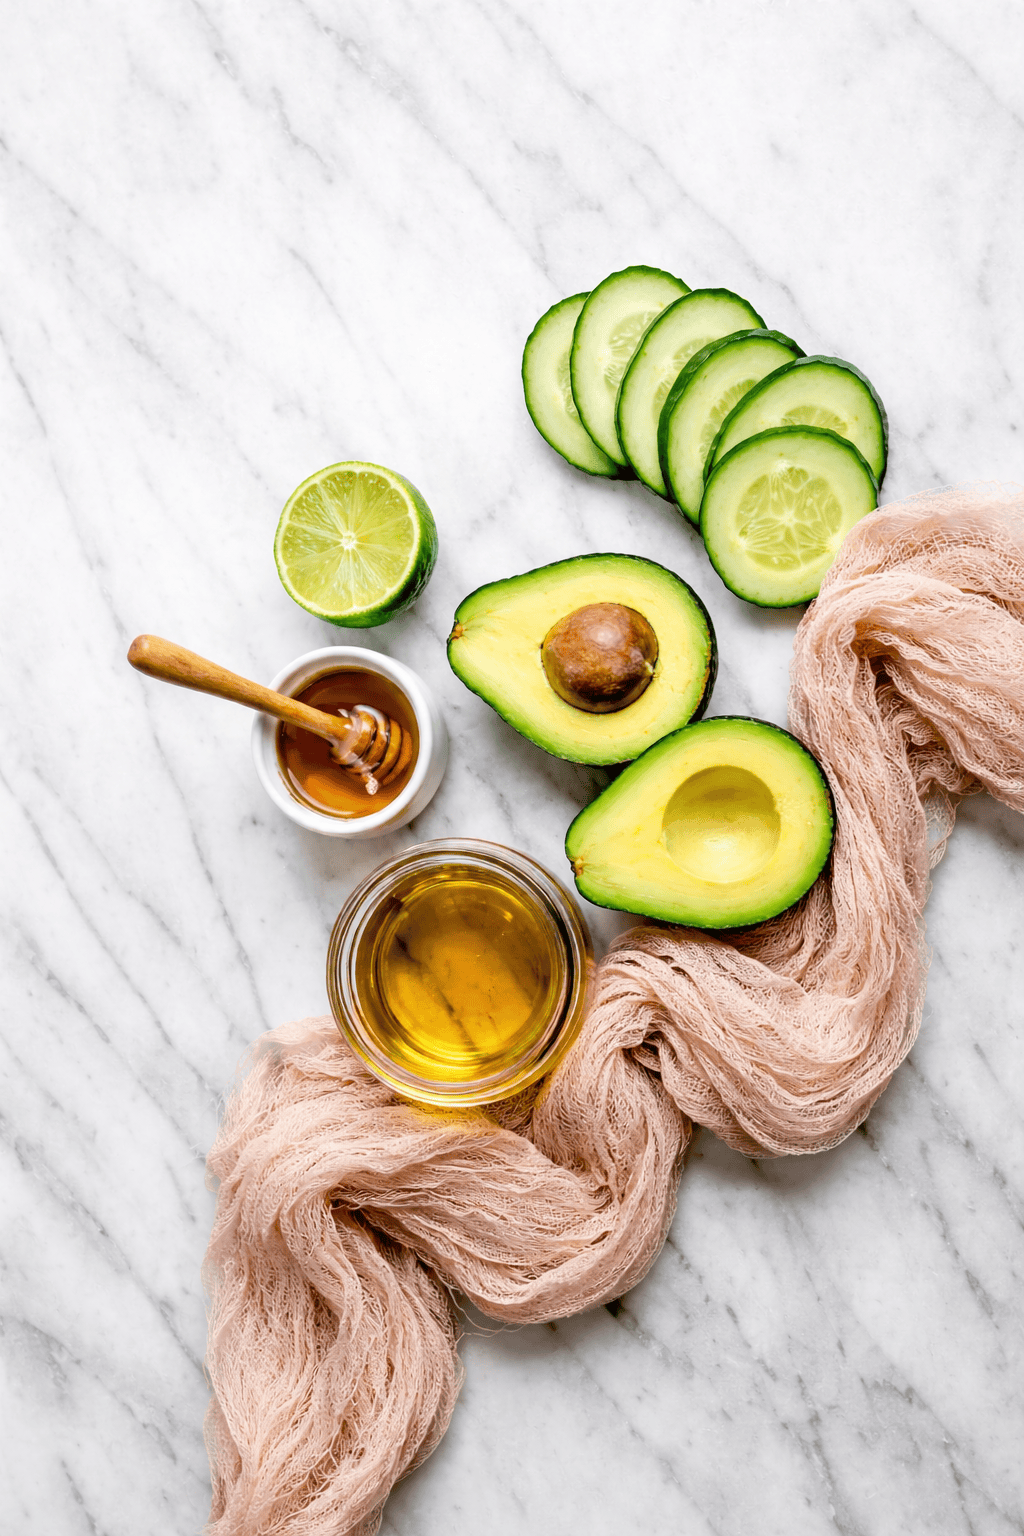
Kid Stuff » 3/4 » DIY Inspired
13th Mar2012

Recycled T Shirt Scrap Skirt

by Dinah Wulf

My little one LOVES to play dress up.

Apply here payday loans

She’ll wear hats…sometimes more than one at a time.

She doesn’t discriminate on the TYPE of hat…

She loves sunglasses and purses…

She loves scarves…

She even wears fairy wings with her PJ’s around the house…

During my spring cleaning, I always bring out a couple boxes.  One for things I would donate and one for things I need to throw away. I noticed I had a ton of cheap (but colorful) old shirts that I was throwing away.

I decided to make a skirt that my daughter can wear to play dress up with. This project took no time at all.  This Recycled T Shirt Scrap Skirt doesn’t need to be perfect because it’s just for play and it’s very easy and inexpensive to make.

I purchased four child sized head bands at the dollar store for one whole dollar.

Simply place one headband around a large round vase or can.

Cut your recycled T-shirts at the desired length.  I cut different lengths.

One by one fold each scrap in half lengthwise and tie them in a knot around your headband as shown.

Here’s a picture of one of my daughter’s best friends playing dress up with it.

Try different colors, patterns, and fabrics.  The possibilities are endless.  You can use the same tutorial with tulle, to create a tutu as well!

*********

Don’t forget to vote for us for the Top 25 Creative Mom Blogs! You can vote once a day.  The contest ends on March 15th! Thank you! Just click here!


Pass it on!
23rd Feb2012

Kids Soap Making Projects: Soapsicles

by Dinah Wulf

By: Sandy Simmons of www.supersoapmakingsecrets.com

If you’ve been making soap for a while and you have children, it’s very likely that your kids will be interested in what you always do. While it is understandable that you would prefer your children not to make soap using the cold process or the hot process because of the involvement of lye, they can easily make soap using the melt and pour method. Children below the age of fifteen will probably need your help and supervision even if the melt and pour process is the process being used.

There are many kids soap making projects that you can do with your children and slowly get them into the craft of soap making. Most of the time, kids soap making projects involve lots of colors, interesting shapes, fun ideas, and soap carvings or embossed designs. Kids usually focus more on the aesthetic part of the process than on the process itself. This should help you stretch your creativity.

Some materials you can consider for a kids soap making project that you may not have considered before are play dough molds, sand castle molds, crayon molds, and any other child’s toy that can be used as a mold (make sure it’s heat resistant plastic). Also try out neon soap colors and/or multiply colors so that you can create color swirls or tie-dye soaps.

Here is a kids soap making project that you can use with old popsicle molds. These are usually made with heat resistant plastic because some popsicle recipes require the liquid to be hot when poured in. Remember to add the sticks so that you get the full effect!

Ingredients:

  • 1 bar clear glycerine soap
  • soap colorant of choice (try to go for a candy color so you get a good effect)

Procedure:

  1. Grate the bar of glycerine soap and place the grated soap in a soap pot or a microwaveable pyrex bowl.
  2. If on a pot, place it over the stove and melt the soap. If using a microwaveable pyrex bowl, place the glycerine in the microwave a few times in ten second bursts of heat till the glycerine is totally melted.
  3. Once your glycerine is melted, add the coloring and mix till the desired color is achieved.
  4. Allow it to cool a little then pour in into your popsicple molds.
  5. Find a way to keep the popsicle molds upright. Watch as the soap hardens. When its a little hard (you can see it solidifying) push in a popsicle stick.
  6. When your soap is completely hard, you can push it out of the molds and you will have soapsicles!

Your kids will surely get a kick out of taking a bath with popsicle sticks. You can also try making tie-dye soaps on rope with them! There are so many other kids soap making projects you can do. It’s a great way to get better at your craft and bond with your kids! So try one soon and have fun!


Pass it on!
14th Feb2012

Coat Hanger Makeover

by Dinah Wulf

Happy Valentine’s Day!

One of my best friends had this yellow-ish wooden hanger she wanted to use in her daughter’s bedroom.  Her room is very whimsical and girlie, perfect for our little “Tay”.  Click here to see some DIY nursery letters made especially for this room.  My friend said she wanted to paint it white.  Since I already had all the essential tools and paint, I offered to do it for her. I used the same paint I used for the Disney Princess table I refurbished.

When I got it home and started painting it, I knew I couldn’t just paint it white.  I wanted to surprise my friend and had to jazz it up a bit.

Here’s what it looked like before. Blah…

I used sand paper to smooth out any bumps or scratches.  Sanding also helps the paint adhere better, especially when you are not using a primer.  For tips on when to use and not to use primer, click here.

After cleaning it off from the dust and debris I painted it white.  Also consider spray paint.  It’s quicker and faster. I decided to use paint because I already had some left over from another project. I used two coats of paint, allowing it to dry completely in between coats.

Next, I used an acrylic craft paint and hand painted pink trim with a small brush.  One coat was perfect.

Tip: Soup cans worked perfectly to hold up the coat hanger while I painted and let it dry.

I purchased these cute little wooden letters from a craft store for about fifty cents apiece and used the same pink craft paint.

Tip: I used a thumb tack to prop up the wooden letter.  This made it easier to hold and paint all sides as well as dry.

I used wood glue to adhere each letter.


**I heart comments! If you have any comments, ideas, or suggestions, please feel free to comment below.  Is there a craft project you want me to try? I’ll gladly do my best to take on your craft challenge and I’m always looking for new ideas! Just let me know! Also, if you have a project you’d like to share, please email me at dwulf@diyinspired.com.**


Pass it on!
30th Jan2012

Repurposed Nursery Furniture

by Dinah Wulf

Over the past few months we’ve had a few cool DIY tutorials perfect for a baby’s nursery.  I posted a step by step how to for a DIY Ribbon/Organization board to hold hair clips and photos. I also shared some DIY Nursery Letters that my best friend made, and perhaps my favorite, I showed you how a refurbished and upcycle an old Disney Princess play table.

But when the little one’s all grown up, what do you do with the old nursery furniture? Repurpose it, of course! I found these amazing repurposed nursery furniture ideas that I had to post. Each unique idea is creative and genius. I love them all!

Cribs

It doesn’t get much simpler than this.  Use the sides of a nursery crib to create shelves to display your collections or as a clever magazine rack.

This is perfect for your future crafters and little DIY’ers! Remove one side of the crib and voila! There you have an instant craft table.  Paint the new table with chalk board paint and hang a white board, hooks and shelves for organization.

This one is pretty cool… a crib turned bench.  I like the all black with white accents.  You can also add pillows made with durable outdoor fabric.

Chalkboard paint can transform just about anything.  Check out this crib turned menu board!

Changing Tables

Your little one may no longer need diapers, but every toddler needs a play kitchen! I have shared repurposed TV media cabinets turned play kitchens, but apparently changing tables work well too!

This last one may be my favorite.  Changing table turned bar cart!


Photo Sources: Consignment Mommies, Encore Baby Registry, My Repurposed Life, BHG, Oh Dee Doh, A Little Learning For Two


Pass it on!
10th Jan2012

DIY Ribbon Board

by Dinah Wulf

DIY-Ribbon-Board-19-1024x768 (560x418)

I always see these cute ribbon boards at gift shops, catalogues, and craft fairs.  They are great for organization for an office or (in my case) my daughter’s room.  I made this DIY Ribbon Board for items such as her hair bows, clips, and photographs.

Another reason I wanted to make this DIY Ribbon Board is because the my daughter’s first baby blanket was getting worn out by the washing machine and I wanted to preserve it somehow, without hiding it in a keepsake trunk where no one would see it.  Here is how I made it.

Materials:

  • Old painting or frame and canvas
  • Fabric
  • Ribbon
  • Scissors
  • Staple Gun
  • Paint (optional)
  • Pliers (if you are using an existing painting)

I had this old painting that was sitting in a box in my garage.

I turned it over and discovered that I needed to use pliers to remove the staples. Remove the canvas.

I took my daughters first baby blanket, trimmed it, and stapled it taut to the canvas.

I decided to paint my frame. I used two coats of paint plus a touch up.

In the meantime, while waiting for the paint to dry, I cut out my strips of ribbon, laying them out in the desired pattern.

One by one, I stapled each ribbon bottom to top and left to right (or vice versa), and then weaving bottom to top right to left. I also stapled the ribbon to the edge of the canvas to make it more secure.

Finally, when the paint is completely dry, (I waited overnight), insert the canvas.

Here are some close up and after pictures.

Thank you for reading!


Pass it on!
18th Nov2011

Repurposed Media Cabinets

by Dinah Wulf

There are so many great things about the flat screen television of today.  For example, a) the picture is almost better than real life, b) they have a great sleek modern look, c) although the screen is bigger, they take up less space because you can hang them on your wall. But the WORST thing about the flat screen TV, especially when you buy your first one, is what the heck do you do with that media cabinet that no longer fits your longer, flatter, modern boob tube?  Well, here’s a little inspiration to help transform your old media cabinet into something more useful.

Here are four great ideas for repurposed media cabinets.

Toy Storage

What is great about these outdated cabinets is the depth.  They can potentially store a lot of things.  I used my old cabinet for my daughter’s toy storage.  I also saved pictures one of her best friends colored and taped them to the inside doors.  When it is closed, the toys are hidden away.

The second picture is also for toy storage.  I saw this on an episode of Home Made Simple.

Craft & Sewing Storage

How cute is this from Girl in Pink? It’s perfect for all your craft or sewing supplies and fabric can be neatly kept and organized in the drawers.

Laundry Station and Organization

I saw this in a Better Homes and Gardens magazine. Add a tension rod to hang clothes and attach a folding ironing board on the side… brilliant!

Kid’s Play Kitchen

This last one is my favorite!  I plan to do a variation of this one (coming soon).

This one is from Design Dazzle. I love the chalkboard door on the front.

This blue kitchen is from an unknown source.  I did find it on Pintrest.  I love how they added a fake outdoor scene out the window.

This last one is adorable! It is from Better After. My favorite part is the mini chandelier… so cute!


Pass it on!
10th Nov2011

Budget Butterfly Birthday

by Dinah Wulf

Having a party and hosting a party doesn’t have to break the bank.  There are always alternatives to spending a lot of money on party decorations.

One of my best friends had a butterfly themed party for her daughter’s first birthday.  On a strict budget, we had to get creative. Here are some creative party ideas for a budget butterfly birthday theme (or any theme for that matter) for less than fifty dollars.

Rule Number One: Use your resources.

It always helps to have fellow mommies as best friends.  We borrowed these butterflies from some of our best friends who also has a young daughter.  These wire butterflies were decorations that were in her daughter’s bedroom.

We also borrowed these lanterns and butterflies from another friend who recently threw a pink and purple baby shower.

Rule Number Two: Raid the dollar bin and the dollar store!

It’s amazing what you can find for parties in the dollar bin at major retail and craft stores.  These purple butterflies were perfect and only a dollar and doubled as party favors for the little guests!

Rule Number Three: Get Crafty on the Cheap (my motto)!

I made this DIY party banner from ribbon and scrapbook paper already in my craft closet.  I printed the butterfly pictures from Google Images.

The hostess spent half the budget on colorful party napkins.  We made over 60 napkin tissue paper flowers and dispersed them throughout the backyard; super cheap for such whimsical decorations.

Rule Number Four: Repurpose and recycle your party supplies.

The hostess had her treasures showcased in her China hutch, however it distracted from the party theme.  We used an inexpensive plastic table cloth to cover the glass windows and created a pretty butterfly and banner display.

For the cupcake dessert display, we used cardboard cupcake towers from two previous parties and added a topper to fit the theme.

Click here for a DIY tutorial on making your own butterfly wings!


Pass it on!
12th Oct2011

Baby Buggy

by Dinah Wulf

I love the creepy and crawliness of Halloween.  For some reason I’m drawn to all things gross and scary. I’ve always been like that.  I can recall wanting to show a scary movie at every single birthday slumber party I’ve ever had.

Since this is my daughter’s real first Halloween (she was only 3 months old last Halloween), I couldn’t help but altering her costume and grossing it out a little. I decided to buy her a little strawberry costume with a raspberry trick or treat pail since they were so inexpensive. Infant and toddler costumes are so cute but not eerie enough for me! They just need a little DIY costume tweek.

Here is my attempt at taking the “before” pictures.  Cut me some slack… since she started walking, it’s impossible to take a good still.

This is an easy Halloween costume makeover. I like to call it my little baby buggy costume.  For a few dollars at the 99 cent store, I purchased plastic bugs, flies, roaches and spiders and glued them to her costume. Be careful with the glue, as you want to make sure you protect your little ones by making sure they don’t play with or put any of the glued bugs in their little mouths!

I knew she would tug and pull on the bugs so I only attached a small trail on the front and most of the bugs on the back of her costume, her hat, and her trick or treat pail.

I attempted to take “after” pictures, but you know how that goes.  So here are a few after shots without baby.

Back

Trick or treat pail

Whole costume

Here are some other ideas to creep out your infant or toddlers costume. Wait… I have to make a disclaimer that I’m really not that sick and twisted… I just love the creative (and gross) part of Halloween!

  • Attach a plastic alien to the belly of a cutsie animal costume so it appears to be coming out of the stomach.  Don’t forget about the fake blood!
  • Attach a fake black crow or raven to the shoulder of a costume.
  • Turn your Disney princess into a dead zombie fairy princess.
  • Put tire tracks and cookie crumbles across the face and front of a Girl Scout uniform (I stole this one from my genius brother so if you think I went a little too far with this one, his phone number is… just kidding).
  • Add green “mold” to those cute fruit and veggie baby costumes and attach a fake rat.
  • Attach a stuffed animal to any garment or existing costume at the mouth to make it look like it is attacking.  Add fake blood at the mouth and teeth.

Who doesn’t love a creepy baby? ;)


Pass it on!
07th Oct2011

How to Make Angel Wings

by Dinah Wulf

OK, I am admitting to the World Wide Web that I cheated. I committed DIY blasphemy… The pink butterfly wings pictured here, I didn’t make, I bought (sigh)… BUT they were free technically!!! That’s my excuse and I stand by it! Because of my mini extreme couponing and thriftiness, I got these wings absolutely free, so I couldn’t pass it up!

Being the DIY Diva that I am, that was really hard to admit because I think DIY costumes or homemade costumes are the way to go, but I felt better when I glammed them up a bit with glitter (of course, Martha Stewart glitter) to match my daughter’s dress for a butterfly themed birthday party for one of her besties.

I DO however, know how to make angel wings (or butterfly wings), so I thought I’d do a quick tutorial, especially since it’s so close to Halloween, my FAVORITE holiday.

Here is a quick tutorial for How to Make Angel Wings. You will need:

  • Four wire hangers
  • Wire cutters (optional)
  • Scissors
  • Two pairs of panty hose or tights (any color or pattern you wish)
  • Duct tape
  • Thick ribbon
  • Glue and embellishments such as gems, glitter, feathers (optional)

Note that if you want to make smaller wings, you can use a wire cutter to cut your hanger in half; you will only need two wire hangers for this project.  Each wing consists of four shaped hangers, two on each side.

Step one:

Straighten your hangers as best you can. If you are making small wings, cut the straightened hanger in half.

Step two:

Curve the wire to make a tear drop shape and twist the ends together. Repeat this step for all four pieces.

Step three:

Place the wires in the shape of wings (two on each side) and use duct tape to secure the center. At this point, the structure of your wings is shaped.

Step four:

Cut off one leg of the panty hose about twenty to thirty inches and pull over one of the four wire pieces.  If you are making small wings, use children’s tights. Tie the end over the taped wire closure in a knot. Repeat for all four pieces. An alternative option is to use four knee high socks.

Step five:

I find it easiest to shape or reshape your wings when the panty hose is already on, be careful not to tear a hole.

Step six:

Use thick decorative ribbon to wrap the center of your wings to cover the duct tape and wire.  Leave two long pieces of ribbon on both sides to create straps.

Step seven:

Ribbon can be tied in bows around your shoulders to attach.  Another option is to use two pieces of elastic. Consider embellishing your wings with artificial flowers, glitter, rhinestones, paint, or feathers.

Pass it on!
03rd Oct2011

No Cost Pirate Themed Party

by Dinah Wulf

Ever thought you could throw a no cost or VERY low cost pirate themed party?  Here is how I did it.

One of my best friends asked for some help with decorating for her 5 year old son’s pirate themed birthday party.  Try out these DIY Pirate props.  I gathered the skulls, bones, and netting from my Halloween decorations, some of her son’s toys, and old Mardi Gras beads. Also, another great friend, and fellow crafty mom Jennifer Hostetler, gathered some fabulous knick knacks from around her house and we came up with this. It cost us absolutely nothing.

We created a pirate’s treasure trove by displaying small vignettes around the house.  Each area had skulls and bones draped in plastic colorful beads, plastic gold coins, and red, black, and gold fabric.  Previously for Haloween one year, I had made poison bottles out of recycled wine bottles by creating my own XXX and skull images on scrapbook paper labels.

With Halloween right around the corner, this theme can also be used for an Adult party or for a Halloween party.  Items around the house to fit a Pirates of the Caribbean theme are globes, maps, candelabras, trunks, empty wine or liquor bottles, gold and silver trays and/or utensils, wine goblets, and mirrors. Gold and beaded costume jewelry intermixed with plastic beads add to it as well.  Don’t forget to look in your child’s toy chest.  In there I found rifles, plastic armor and plastic gold coins, snakes, and spiders.

There you have it! Homemade halloween ideas for a pirate themed party on the cheap! I am so excited that it’s October already.  I have some great Halloween projects to come!


Pass it on!
14th Sep2011

Do It Yourself Wall Art

by Dinah Wulf

When it comes to budget decorating, do it yourself wall art is the way to go. I don’t really see myself as an artist, maybe more of a crafty “ish” person.  This DIY wall art I came up with was fun and easy and if you decide to take it on, it’s VERY inexpensive. It also makes a great gift!

I love the silhouette of birds and trees because they are beautiful and modern, so I decided to make these do it yourself art pieces for my daughter’s bathroom.  I wanted them to be whimsical and feminine.  I already had the frames and the colored scrapbook paper so this project didn’t cost me a dime! By the way, a great source for inexpensive cute frames at IKEA.   You can purchase traditional to modern frames starting at 99 cents!

The first thing I did was look online for inspiration, because let’s face it, I’m not THAT creative.  Google images is the way to go. I ended up googling “retro bird art” to find my inspiration.  I copied and altered a few silhouettes of birds and trees and first cut them out of white card stock.  I wanted to arrange them first and make sure I had the right scale to fit the frames. I had to cut and trim them a few times to get it perfect.

Next, I traced and cut out the final images out of decorative scrapbook paper.  I used several contrasting colors and patterns to match my daughter’s bathroom and arranged them to my liking. Double sided tape (one of my best friends) worked well to attach each image.

There you have it! Instant budget DIY wall art!


Pass it on!
31st Aug2011

Carnival Theme or Circus Theme Party

by Dinah Wulf

Carnival Theme or Circus Theme Party

One of my best friends, Jennifer Hostetler, ALWAYS comes up with amazing ideas for a theme party.  This year, for her daughter’s first birthday, she decided to do a Circus theme.  With a little do it yourself creativity and a lot of imagination, Jennifer hosted a fabulous party on a budget.  Carnival theme or circus theme parties are great party theme ideas.

DIY Centerpieces

If you read this blog, you KNOW what a HUGE fan I am of dollar bin decorating, especially for a kid’s theme party.  Jennifer found these great circus themed pieces for the centerpieces. She took it one step further and glued popcorn and peanuts to give them a more realistic look. I love the way she made them all different.

Plastic Popcorn Tubs for Movie Night! – 1 Jumbo Tub and 4 Individual Tubs

Carnival Giant Decorating Kit
Carnival Game Ideas

Jennifer came up with these easy and inexpensive party game ideas to fit the carnival theme.  To keep the little guests busy, some of her party games included, a ring toss, baseball toss, and balloon dart throw.  For the ring toss she secured each empty beer bottle with glue onto a square wooden board.  I give it two thumbs up just for the beer bottle recycle factor!  Jennifer also recycled baby snack containers for the baseball toss by removing the label, painting the can, and weighing them down with pebbles.  She simply stacked three cans on a bar stool.

Candy Dessert Table

Big Top Carnival Treat Boxes – 12 per unit
I’ve posted before that a candy dessert table has a trifecta factor.  It is beautiful to look at, gives the guests something to do, and is tasty to eat.  Check out Jennifer’s gorgeous and colorful candy dessert table. She used a round table, which looked beautiful and yummy from all sides.  She created height with wrapped boxes and color and pattern with ribbon.

Do It Yourself Decorating

One thing about Jennifer is her attention to detail.  Check out these other great do it yourself decorating ideas for a circus theme party.

Jennifer is definitely someone who inspires me.  I didn’t even post half of the amazing details of this party.  Look out for her upcoming budget party blog to see the rest!!! I’ll be the first to let you know when it launches!  Thank you Jen for the inspiration! Love you!

Have you signed up for my emails? I’d love it if you did!

Enter your email address: Delivered by FeedBurner


Pass it on!
30th Aug2011

Dollar Bin Picture Frame Collage

by Dinah Wulf

Dollar Bin Picture Frame Collage

I bought these frames simply because they were cute and cheap (music to my ears) and decided to make a mini family picture frame collage for my daughter’s play area. I purchased these frames at an arts and crafts store like Michaels for one dollar each.  Here is how to make your own mini picture frame collage.

The materials needed are: mini frames, paint (optional), glue gun, ribbon, key rings.

Step One: Arrange the Frames to your liking and take a digital picture so that you can easily refer back to it.

Step Two: Remove the stand on the back of the frame. They can easily be snapped off.

Step Three (Optional): Paint each frame the desired color.

Step Four: Print and add your pictures to your frames. I used both black and white pictures and fabric. You can also use, gift wrap, or wallpaper to add to your desired design.

Step Five: Using a hot glue gun, refer to your digital photo and glue each frame together in the desired arrangement and let it dry completely.

Step Six: To make the picture hangers cut ribbon and loop it thru a key ring. Hot glue the ribbon together and then hot glue the hangers to the back of your collage.  Because the frames are so light weight, hot glue and ribbon are sturdy enough to hold the collage.  I used two key rings for even weight distribution.


Here are some After Photos:


Feeling Crafty? You may also like:


Pass it on!
24th Aug2011

Repurposed Kid’s Storage Solutions

by Dinah Wulf

Repurposed Kid’s Storage Solutions

Summer is almost over, which means it’s time for back to school!  There’s no better time than now to make sure your little ones are organized and clutter free. Better Homes and Gardens is one of my favorite websites and magazines to peruse for innovative storage solutions and ideas. Here are some of my repurposing favorites to get your kid’s rooms organized.

Repurpose an old computer/media cabinet for kid’s toy storage. The depth of these cabinets are perfect and keeps the clutter and toys hidden away.  Add storage cubes, baskets, or shelves inside.  You can also add a tension rod to hang things for another storage solution.  Also consider adding hooks on the inside doors to hang other items or display your child’s artwork as well.

Repurpose office storage containers for your child’s supplies.  An unused letter or mail sorter is the perfect size for lotions, wash clothes, and bath wash.  Use a pencil holder for cotton balls or Q-tips. Use bins for diapers or blankets.  Add decorative paper or photos to match the nursery decor.

Repurpose kitchen tools like rolling pins and baking pans to hold jewelry and pictures.  Baking pans are magnetic, and perfect for holding artwork or notes.  Another option is to paint the baking pans with chalkboard paint.  Use S hooks on the rolling pins to hang hats or purses.

Repurpose a chest of drawers for tools as a side table with extra storage.  Metal tool boxes are perfect for a little boys room.  Red is a great color too!

Photo Source: BGH.com

Pass it on!
13th Jul2011

Paul Frank Party Centerpieces

by Dinah Wulf

Paul Frank Party Centerpieces

I am having a Rock N Roll Paul Frank birthday party for my daughter because my husband loves music and I love Paul Frank, and well my daughter’s only turning one so she didn’t have much say. I knew it’d be a tough theme, so I had to get crafty and creative. I made these party centerpieces in purple, green, pink, and yellow. I went with colored plastic grass and paper flowers in “pots” because it is a summer birthday party.

Materials:

  • Square containers
  • Scrapbook paper
  • Wooden sticks from any craft store, or BBQ Skewers
  • Floral foam
  • Paul Frank stickers (optional)
  • Plastic Grass or colored candies
  • Hot Glue gun
  • Scissors
  • Craft punches (optional)

These are very simple to make, as the pictures speak for themselves.  Just cut out the desired shapes and glue or tape them to wooden skewers.  Insert them in decorative containers to make a decorative bouquet.

You can make these arrangements in any theme you choose.  Here are some tips.

  • Click here to find out how to make pinwheels
  • Use Google Images to look for your theme’s pictures to use in your arrangement
  • Use assorted craft punches or cut out flowers by hand
  • Click here to find out how to make paper flowers
  • Colored candies, like M&M’s can also be used to conceal the floral foam.
  • The dollar bins at major retailers like Target, always have cute containers in a variety of colors and patterns.
  • Use rocks or pebbles at the bottom of your arrangement to weigh it down if your party is outdoors.
  • Click here for ideas on making matching party favors.

You May Also Like:

Pass it on!
12th Jul2011

Creative Rocker Themed Party Invitation

by Dinah Wulf

Creative Rocker Themed Party Invitation

These do it yourself Rocker themed party invitations, using scrapbook paper, are SUPER easy to make.  I wanted them to look like VIP concert backstage passes, so I purchased lanyards to attach to each one.  You can purchase lanyards online for about $4.00 for a dozen.

The party details fit on the front and I made a medallion for the back encouraging “rocker attire”.  Each guest can wear them to the party as well if they choose.

Tip: Stuff temporary tattoos in the invitation envelope to get guests started on their Rock Star outfits.


Consider these other Rock Star themed ideas:

  • Make invitations that look like concert tickets or an ad looking for a new member of a band
  • Make a CD invitation and include the guest of honor’s favorite songs
  • Decorate with a VIP sign at the entrance of the party
  • Include a red carpet area with disposable cameras where the guests can be photographed by Paparazzi
  • Have a “Dressing Room” station with boa’s, sunglasses, hats, wigs, beads, ripped T-shirts, and face paint for guests to get creative
  • Include a “Hair and Makeup” station with glitter, mousse, mirrors, makeup, and colored hair spray
  • Have a “Tattoo Shop” with application instructions where guests can apply temporary tattoos of their choice
  • Set up a “Rehearsal Stage” and set up Guitar Hero
  • Give out favors like an autograph book or an inexpensive inflatable guitar


Need More DIY Party Ideas? Try:

Pass it on!
11th Jul2011

First Birthday Party DIY Decoration Ideas

by Dinah Wulf

First Birthday Party DIY Decoration Ideas

Friend and fellow Crafty Chick (and may I add GORGEOUS), Tara Woelfer, did a fabulous job for an Elmo themed first birthday party.  Here are some Birthday Party DIY Decoration Ideas. She used bold primary and secondary colors coordinated with polka dot and checkered patterns. She covered boxes with colorful gift wrap, which is a great way to add height and dimension to any table scape.

Tip: A good investment for any party host or hostess is glass candy jars and glass bowls in various sizes and heights.  Add a ribbon and label to fit any party theme.

The dessert table was adorned with a “sweets” banner a topped with creatively labeled yummy treats like marshmallows, chocolate covered strawberries with sprinkles, colorful candies, cupcakes, and savory cheese popcorn.  Tara also added a special touch by personalizing some of the treats with the birthday boy’s name and age.

The centerpieces were assembled with checkered pinwheels in plastic pales, and pictures of the little man of honor.  Do it yourself Pinwheels are a creative and simple way to add whimsy to any party centerpiece. Use decorative scrapbook paper in any color or pattern to fit any occasion. Also, consider using pages of old novels, children’s books, or magazines depending on the party theme.

Thanks for the inspiration, Tara!! You are amazing!

The fabulous photography is by Carrie Sparks.

Need More DIY Party Ideas? Try:

Check out these Sweet Treats, perfect for any party:

Pass it on!
27th Jun2011

Upcycled Children’s Play Table

by Dinah Wulf

Upcycled Children’s Play Table

One of my best friends gave me this Disney princess table when she moved. I loved the shape of the chairs and the storage pocket in the center; however it was a little worn from use.

I decided to take on this DIY project, paint it, and “glam” it up a bit with a Hollywood Regency style. This do it yourself  project required painting it, adding seat cushions, a monogram, and a clear crystal knob. I had the primer, paint, and fabric from past projects already, so the total cost for this table and two chairs was less than $20.00.

Here is the after:

I decided to prime it first, even though the surface was already smooth due to the existing character design. I used a light sand paper to help remove a few old stickers, and cleaned the surface. Two coats of primer worked perfectly. When priming, make sure the paint is completely dry in between coats.

I painted both chairs and table with two coats of white paint. After is dried completely, I used painters tape to tape off my design. I painted the design, the storage cover, and the balls of the table legs and chairs blue.

After you paint is completely dry, I recommend painting the table top with polyurethane with at least two coats. It is added protection for it’s future marriage with crayons and markers!

Meanwhile, I used a circular wooden plaque, polyester fiber fill, and fabric for the seat cushions.

When stapling fabric onto the plaque, it’s best to keep the extra material and trim it after.

I glued the seat cushions to the chair with an extra strength wood glue and added a self adhesive monogram. I also added a few coats of decoupage medium to seal in the monograms.

Next, I reattached the storage bag and added a knob to the lid.

Here are some before and after pictures.

Since I didn’t have to buy paint or fabric, here is what I ended up spending. Not too shabby!

  • Clear Plastic Knob - $2.97
  • 2 Monogrammed Letters - $2.97 each
  • 2 Wooden Plaques - $5.49 each
  • Polyester Fiber Fill – $2.99 for one bag

Total Cost: $17.39 plus tax

Check out these other Before and After DIY Projects:

Pass it on!
23rd Jun2011

Mauli Ola Foundation

by Dinah Wulf

Mauli Ola Foundation

I have come to realize that there is a certain power that comes with blogging.  What I mean by that is I feel that I have the ability to reach out to several people. Sometimes, you have to stop and step aside from what you are doing and use your “power” to bring awareness to causes that are important to you. This year, my husband and I were introduced to an amazing foundation, the Mauli Ola Foundation that supports children with Cystic Fibrosis (CF). Mauli Ola means “breath of life”.  This foundation is close to our hearts because we have a six year old niece with CF. These are some pictures we took at one of the events.

Cystic fibrosis is a life-shortening genetic disease of mucus and sweat glands that affects the lungs and digestive system. In 2007, Australian doctors revealed that young surfers with CF had noticeably healthier lungs. They discovered that inhaling saltwater mist had a powerful effect on rehydrating the lining of the lungs, clearing out patient’s nasal passages and airways. As a result, there are less infections and hospitalizations. Hence, surfing increases overall health and potentially increases lifespan. Because of modern treatments such as this, the life expectancy of a patient with CF has drastically increased over the last two decades from 9 years old to about 37.

The Mauli Ola Foundation (MOF) has teamed up with several professional athletes and surfers like Kelly Slater and Bruce Irons to support children with CF. They have taken hundreds of patients surfing at their MOF Surf Experience Days which have taken place all over the California coast and Hawaii. If you would like to donate or volunteer for MOF or simply learn more about CF, please visit their website.

You May Also Like:

Pass it on!
22nd Jun2011

DIY Nursery Letters

by Dinah Wulf


DIY Nursery Letters

Naming my daughter was one of the toughest things I have ever had to do (not really but it was very taxing). We asked family and friends and even strangers their opinions, searched online and read baby naming books. My husband and I even had 15 minute brainstorming sessions where we would each write down all the names we loved as quickly as possible and then convened to see if any of them matched. I mean come on, there are countries that have baby naming ceremonies… it’s a big deal! So why not commemorate all your hard work by displaying the coveted name in your little one’s room?

Your child’s name in decorative nursery wall letters is a charming DIY craft to personalize a baby’s room, however are costly at $20-$50 each at a baby boutique. I say, do it yourself for a fraction on the price.  The letters shown in this project, done by one of my greatest and dearest friends and fellow crafty mom, Jennifer Hostetler, cost less than $4.00 per letter. Add paint or decorative or scrapbook paper to match your theme for a few extra dollars. Jennifer embellished each letter with wire ribbon and a craft rhinestone to match a brown and pink themed nursery for one of our uncrafty besties (isn’t she sweet?).  The letters can be found at any craft store like Joann’s Fabric and Crafts for around $3.00 each. One roll of ribbon works well for three letters and costs approximately $2.50 per roll. The total cost for this projects was less than $30.00 for all six letters!


Pass it on!
02nd Jun2011

DIY Gifts: Baby Sushi Gift

by Dinah Wulf

DIY Gifts: Baby Sushi Gift

One of the greatest inspirations in my life is my big brother.  He has been a Designer for about eight years, but to me he has been designing since he left the womb.  For example, when I was in elementary school, my brother would make my Halloween costumes.  These were not just any Halloween Costumes; they were amazingly creative and elaborate and made me an instant hit during the playground parades.  One year he made be a giant TV out of a cardboard box and my head was the picture. It was complete with a table, table cloth, remote control, and TV Guide. Everyone else was wearing those plastic costumes and a backless mask with a piece of elastic holding it on your face.  Remember those? Keep in mind that this was years before the internet and before all these reality how-to shows… oh and did I mention he was about ten years old at the time?

The best way to describe my brother is that he is a cross between Macgyver and Martha Stewart. He made me this gift when he first found out he was going to be an Uncle, and I HAD to share it. I think the pictures speak for themselves. Besides the old sushi container and the chopsticks, he made everything else…the life like sushi design, the label, and the onesie (there were actually two onesies but one of them is packed in a box for future baby). He’s a genius!

P.S. Please check out his portfolio here.

You May Also Like:

Find great links for perfect DIY gift ideas here:

Pass it on!
03rd May2011

How to Make a Lamp Shade Better

by Dinah Wulf

Here are easy instructions on How to Make a Lamp Shade Better.  I bought this lamp for my daughter’s room and wanted to dress it up a little.

Being the cheapskate I am, five bucks was my limit on this do it yourself project. So I bought a $3.99 roll of hot pink ribbon and a butterfly and came up with this.

Materials Needed:

  • Lamp Shade
  • Ribbon
  • Hot Glue Gun

Simply wrap the ribbon in a criss cross pattern and use hot glue to secure it along the edges of the shade.  Embellish it with a butterfly or rhinestones. It looks great both on and off!

Inspired by this post? You may also like, Updated Baby Storage Bins.

Try these other DIY decorating ideas:

Need more inspiration? Check out these Interior Design Ideas:

Pass it on!
Pages:«1234»