Easy Nursery Decorating DIY Ideas
Quick and Easy Nursery Decorating DIY Ideas including Simple Wall Art Projects and Storage Solutions
Some of the materials list below have affiliate links for recommended supplies.

DIY Nursery Letters
Your child’s name in decorative nursery wall letters is a charming DIY craft to personalize a baby’s room, however are costly at $20-$50 each at a baby boutique. I say, do it yourself for a fraction on the price and in just 3o minutes.
Time: 30 Minutes
Materials:
- Letters
- Paint
- Paint Brush

- Wire Ribbon
- Rhinestones

Instructions:
The letters shown in this project cost less than $4.00 per letter. Add paint or decorative or scrapbook paper to match your theme for a few extra dollars. Embellish each letter with wire ribbon and a craft rhinestone to match a nursery. The letters can be found at any craft store like Joann’s Fabric and Crafts for around $3.00 each. One roll of ribbon works well for three letters and costs approximately $2.50 per roll. The total cost for this project was less than $30.00 for all six letters!
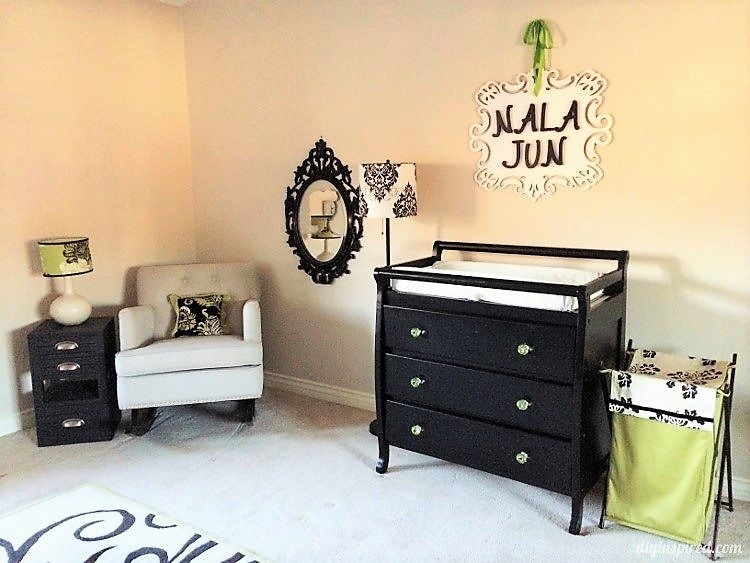
DIY Nursery Name Plaque
To make this super easy name plaque you only need a few things.
Time: 20 minutes (not including dry time)
Materials:
- Wood Letters
- Unfinished Wood Laser Cut Frame
- Wood Glue
- Foam Paint Brush
- Paint
- Ribbon
I found the letters and frame at Michael’s Craft Stores. They have a huge selection so it was hard to choose.
I painted the frame white. The letters came in black so I didn’t have to paint those.
Once the paint was dry, I glued the letters onto the plaque. I also attached a green ribbon to the back. This part was tricky, because the letter and plaque I chose were a little heavy. Glue would not hold. So, I attached the ribbon with a staple gun very carefully. Since the wood was thin, I bent the staples over and painted over them in white. Depending on the size and weight of your wall art, hot glue may suffice.
If you haven’t seen the rest of Nala’s nursery please check it out!
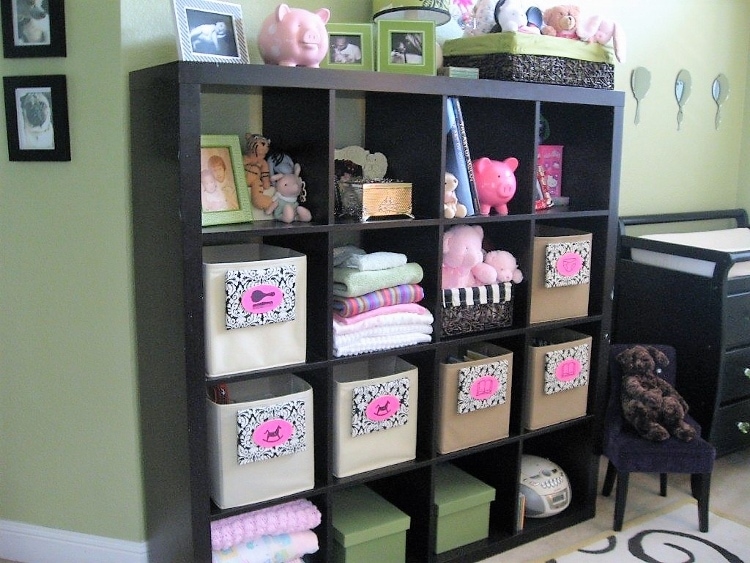
Updated Baby Storage Bins
Wait… did that sound right? Not storage for BABIES babies, but storage for all the crap that comes with them! So, I wanted to do something fun for my daughter’s bedroom and decided to add a little life to these bland storage bins for her toys, books, and diapers.
Here is how I made these updated baby storage bins.
Time: 30 Minutes
Materials:
- Fabric Storage Bin
- Material of choice
- Wooden frame
- Hot glue gun
- Staple gun
- Oval wooden plaque
- Computer
- Colored scrapbook paper of choice

Using a staple gun, staple fabric to the wooden frame and hot glue it to the fabric bin. Wooden frames can be found at IKEA for $1.99 for three! The design is up to you. I printed out symbols that my brother designed with my computer on scrapbook paper and glued it to an oval wooden plaque.
Nursery Sign Upcycle
I wanted to share this quick nursery sign upcycle (pictured above) I did for my daughter’s room. Check out my room tour to see the rest of it. I got a heck of a deal on this metal “dream” sign at Michael’s. It was one of their rare 80% off clearance sales and I couldn’t pass it up.
I loved this sign as is, however the silver metal color did not match either of my daughter’s rooms. It’s a decent size, and I bought it for $8.00! I figured, even with the cost of a can of spray paint, it was still a great bargain.
I spray painted it gold with Krylon’s Metallic Gold spray paint. I only had to do 3 light coats and spray painted the front only.
The rustic twine hanger didn’t quite match either, so I used some lace ribbon I had to replace the hanger. I hung it above my daughter’s bench seat in her nursery. This goes to show that you can create a beautiful space on a budget with a little creativity.
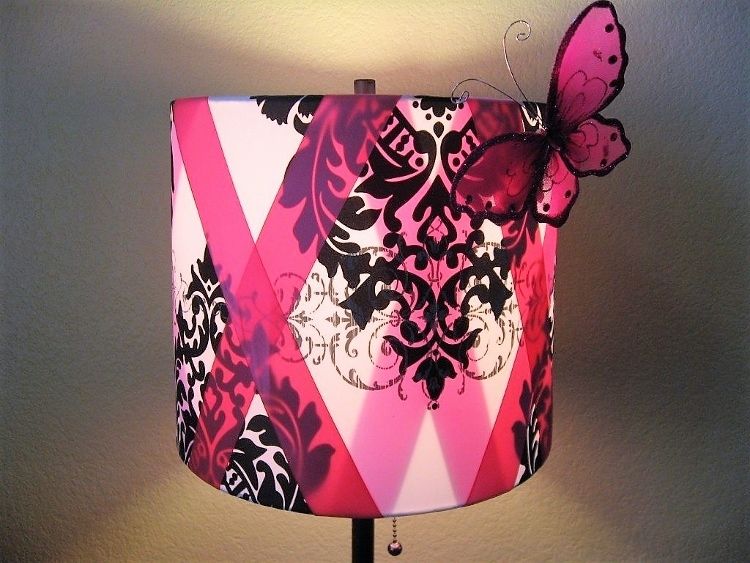
How to Make a Lamp Shade Better
Here are easy instructions on How to Make a Lamp Shade Better. I bought this lamp for my daughter’s room and wanted to dress it up a little.
Being the cheapskate I am, five bucks was my limit on this do it yourself project. So I bought a $3.99 roll of hot pink ribbon and a butterfly and came up with this.
Time: 10 Minutes
Materials Needed:
- Lamp Shade
- Ribbon
- Hot Glue Gun

Simply wrap the ribbon in a crisscross pattern and use hot glue to secure it along the edges of the shade. Embellish it with a butterfly or rhinestones. It looks great both on and off!
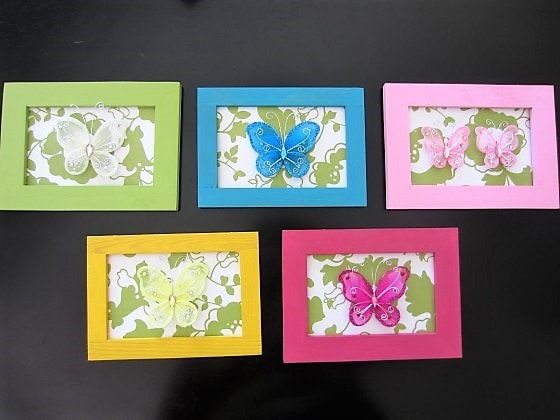
DIY Butterfly Wall Art
One of the things I do when I’m bored is stare at my craft closet to see if there is anything I can make without purchasing something new. I had these wooden frames left over from a Wine Tasting Bridal Shower party I did and these butterflies I bought from a craft store that was going out of business a while ago (I bought 80 of these butterflies for less than $10). These butterflies are great to adorn gifts, my initial intention for their use. Anyway, with left over craft paint and scrapbook paper, I decided on DIY Butterfly Wall Art for my daughter’s bedroom.
Time: 15 Minutes
Materials:
- Wooden frames
- Craft Butterflies
- Scrapbook Paper
- Paper cutter or scissors
- Craft paint
- Paint brush
- Hot Glue Gun

First, I painted each wooden frame. By the way, you can purchase these frames in packs of three from IKEA for $1.99… cheap! Meanwhile, while the paint was drying, I cut out scrapbook paper to fit the frames (4X6) with a paper cutter.
I assembled the frames when the paint was dry and using a hot glue gun, attached the butterfly to the center of the frames. You have to hold the butterfly in place for a few seconds while the hot glue dries. I hung them above my daughter’s window in her room.
I hope you found thee tips useful. With a little imagination, decorating a nursery on a budget is not difficult to achieve!
Like it? Pin it!