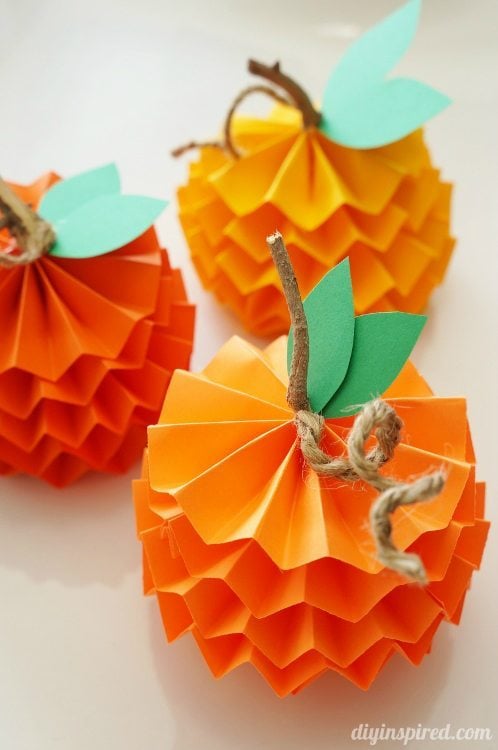
How to Make Paper Pumpkins for Fall
Paper Craft Tutorial: How to Make Paper Pumpkins for Fall
These little pumpkins are so much fun to make. It’s a fun Fall craft you can do with your kids or a great adult craft to spruce up your mantel or table decor. You can try it with different colored papers in different patterns as well. Here’s my step by step tutorial for how to make paper pumpkins for fall.

Here’s What You Need
Materials:
- Colored or patterned paper of choice
- Paper Cutter

- Double Sided Tape
- Hot Glue and Glue Gun
- Sticks
- Twine
- Scissors


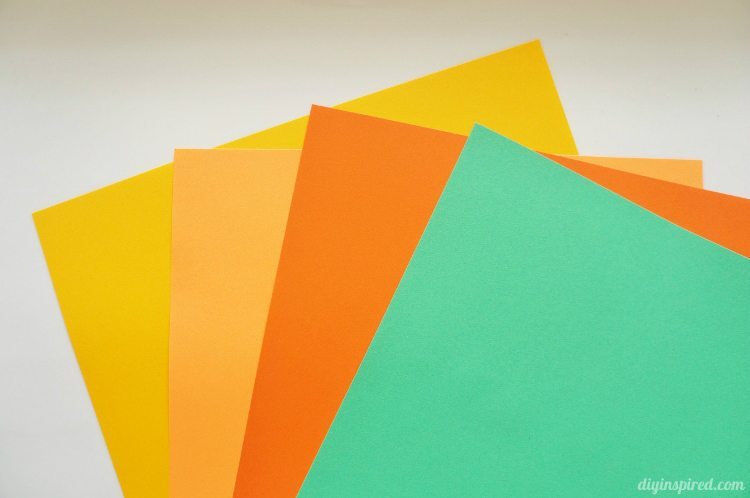
I chose these colorful Astrobrights papers. For each pumpkin you need two 8.5”X11 sheets.
Instructions
Cut each piece of paper vertically into five 1.5” wide strips.
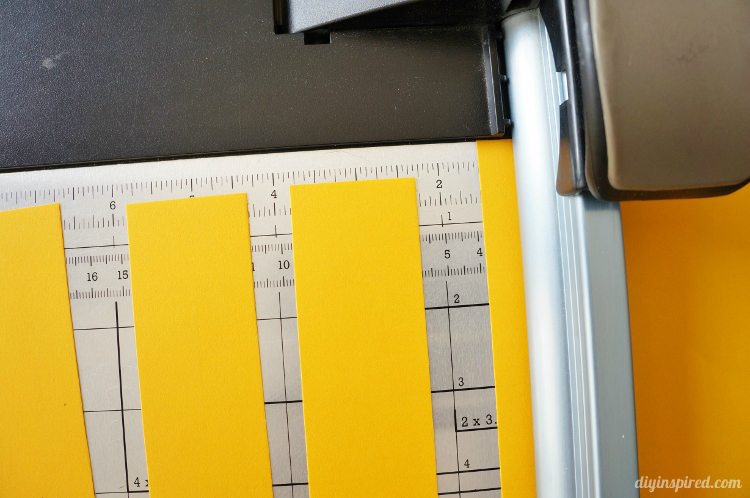
Then cut each strip into one 7”, two 9”, and keep the remaining two at 11”. Important: Remember, you need two sets for one pumpkin. So each pumpkin is two pieces of paper – two 7”, four 9”, and four 11” strips.

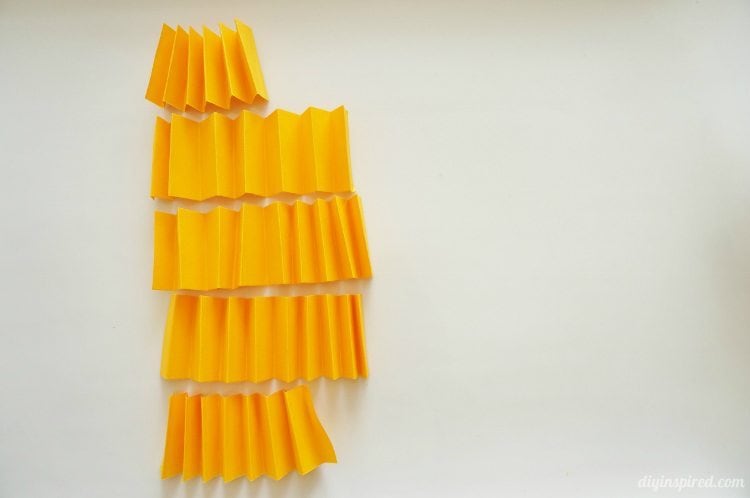
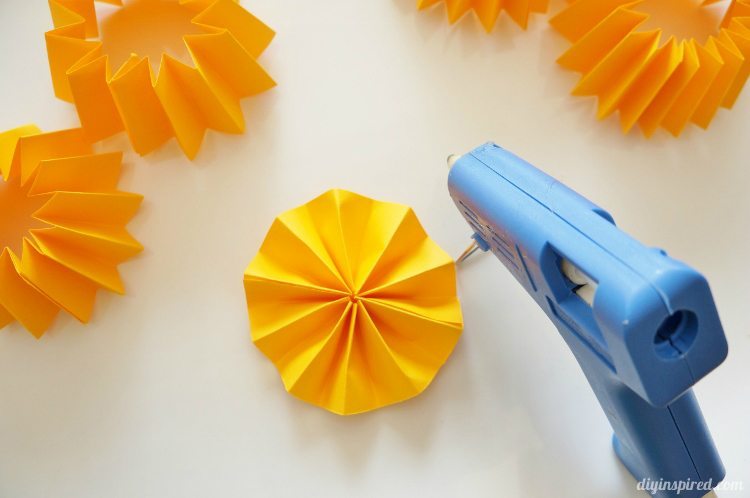
Fold each piece into accordion strips. Pictured here is one sheet of paper.
Next tape the TWO SETS at same lengths together with double sided tape and form a circle.
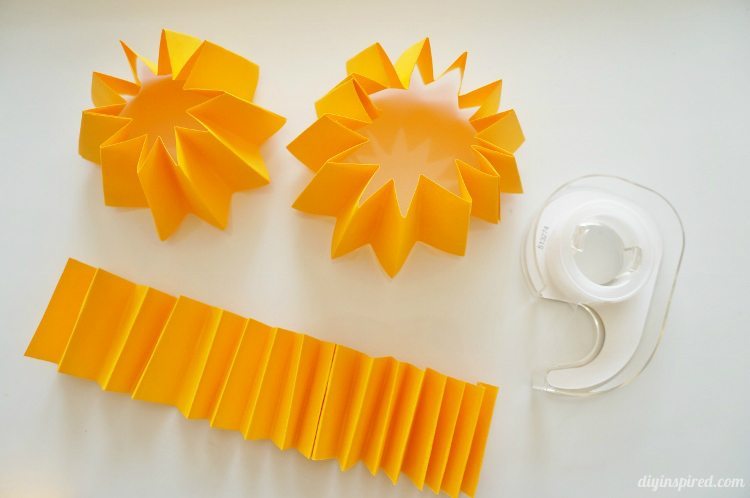
You will end up with one circle from the 7” strips, two circles from the 9” strips, and two circles from the 11” strips.
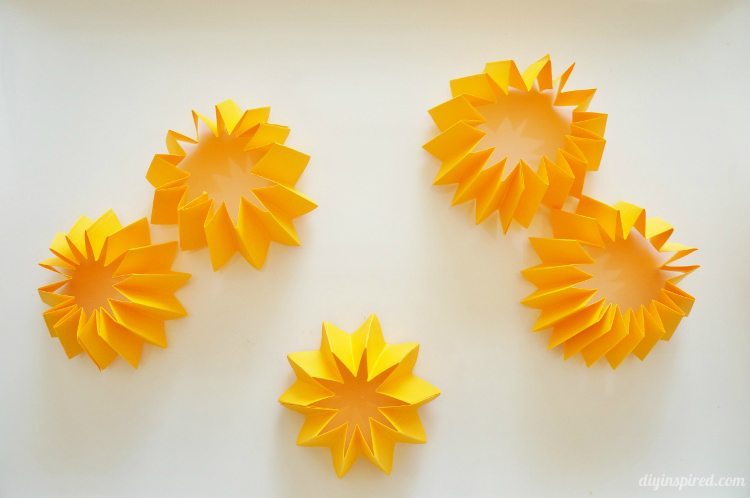
Create the 7” medallion by gluing with a hot glue gun. Just place a small dab in the center and hold a few seconds until it is dry.
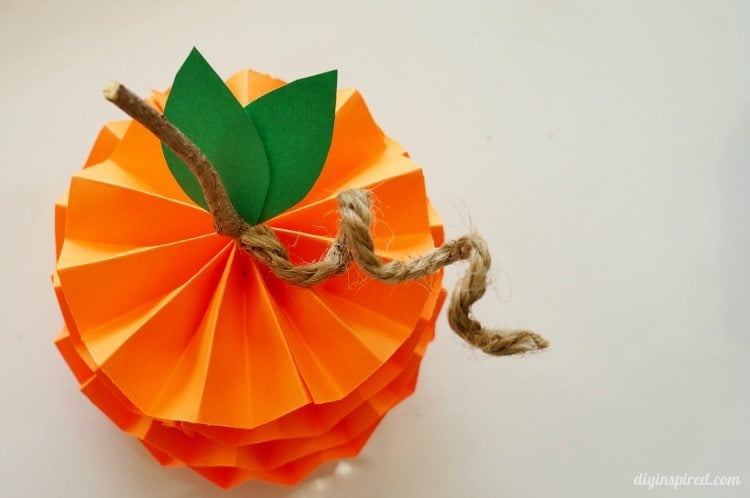
Next, glue each medallion together respectively starting with the 7” on top, then 9”, then 11”, then 11”, then 9” on the bottom.

Hot glue a stick, paper leaves, and twine on the top of your pumpkin.
Here are a few AFTER photos!
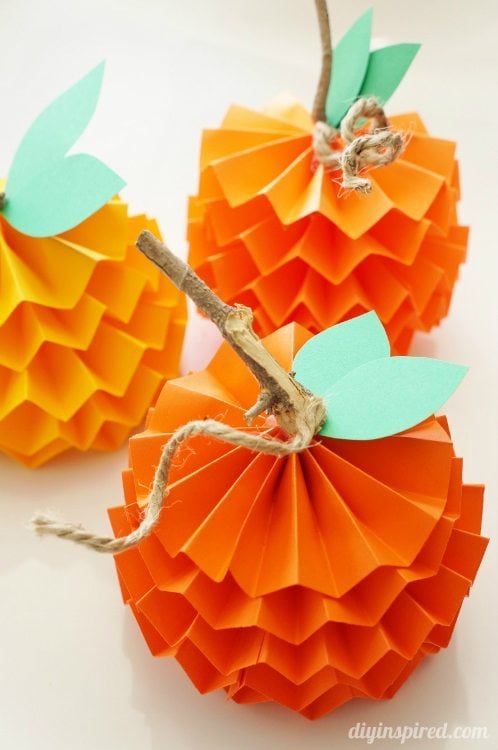
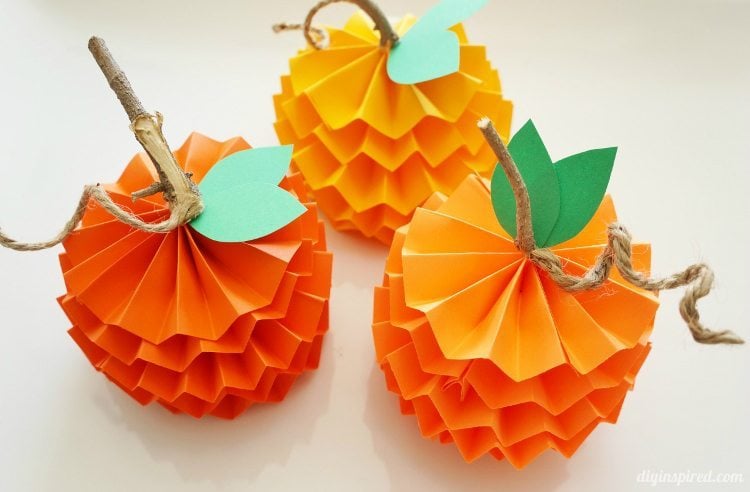
Use them to decorate for Halloween or Thanksgiving. You can play around with the sizes, colors, and patterns. Group a few together at a kid’s table, adult’s dinner table, or on your fireplace mantel.
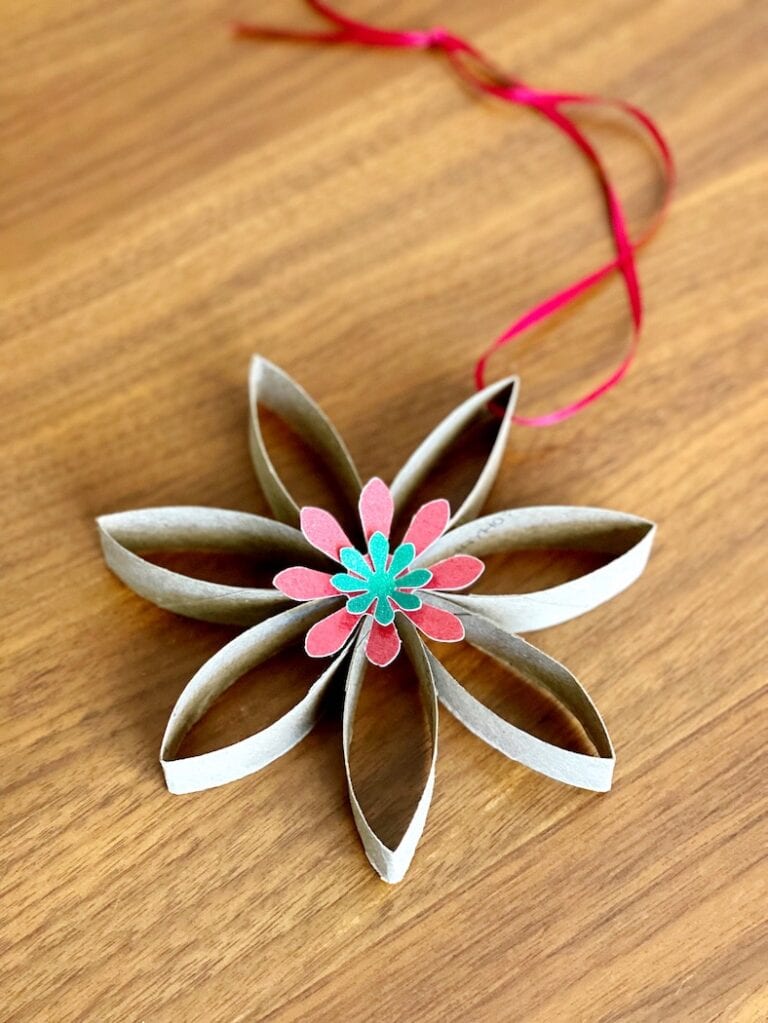
Update: After some feedback, I made a new tutorial for a similar project for Christmas. This tutorial may help with more detailed explanation using the same technique: How to Make Paper Christmas Ornaments
You May Also Like
Here is another fun paper craft on how to make hyacinth paper flowers. You can see the full tutorial here: Curled Hyacinth Paper Flowers
These will be perfect for my Halloween party!
So glad you like them, Alison! I DID realize however that I shaped the pumpkin leaf incorrectly. I should have googled it first so they looks less like oranges! Ha!
this did not work when you glue them together how do you make like a circle
Hi Brian! Did you make two of each strip?
It didn’t work for me, either, and yes, I made two sets.
These are so cute! Pinning!
Thank you SO much, Haeley!!
SO FUN THANK YOU!
Thank you, Suzanne! You’re welcome!!
These are so cute! I have a die for my die cut machine that makes those rosettes. I am going to have to try to make some of these this fall. Thanks for sharing!
What a great idea!! I didn’t even think about that. Thanks, Jen!
So fun, and easy!
Here from Inspire Me Monday.
Thank you, Melinda!
So adorable! Love them! Pinning.
Thank you for sharing with us at the Brag About It Link Party!
~Laurie
Thanks for having me again, Laurie!! So fun!
Love these so cute and easy!
Thank you, Valerie!
What a darling idea! I can’t wait to make a bunch of these–they are too, too cute!
Thank you so much, Ruth Anne! They are addicting to make!
Very cute!! Thanks for sharing these on Idea Box!!
Thanks for having me again, Cyndee!!
These are adorable! They look pretty simple, I may have to try and make them for fall! I would love if you stopped by and shared on my Friday Favorites Link up!
Thanks, Jennie! I’ll be sure to check it out!
Oh those are great! Easy enough for kids to do, but classy and unique enough that it doesn’t look like a total preschool craft 😉
Thanks for sharing us at the #HomeMattersParty link party
So sweet, Alayna! Thank you!!
Cute and a way to use up your orange craft papers!!!
Thank you, Donna!
So cute but I do wonder – did you glue each circle into a medallion before assembling? Thanks.
Hi Lisa! I put a spot of glue in the center to hold the medallion in place, then stacked and glued the medallions together. Is that what you mean?
Yes, thank you!
These are so adorable and clever Dinah – pinning now! Looking forward to meeting you in San Diego!
Thank you, Kimberly for stopping by. I’ll see you soon!!
Can you please show me a video of you making these as we have been trying for two hours and the shorter strips are not going together. We needed them for Saturday for girl scouts. Thank you
Hi Debi, are you using two of each strip? The photo with the measurements should be times 2. Let me know if that works!
Hi. Yes the 11 inch worked fine but when we folded the 9’s and 7 we couldn’t get them in a circle
Hi. Yes the 11 inch worked fine but when we folded the 9’s and 7 we couldn’t get them in a circle. They gave us construction paper could this be the problem?
Hi again. I just read the instructions above again. I don’t know why but on the instructions I had I didn’t remember seeing that you have to tape two 7inch strips together. I will pass this on to the leader
Hi Debi, OK, I hope it works out! Let me know. I’d love to see pictures.
hi there. ive been trying this for table decorations at our thanksgiving feast amd the inch part s really getting to me! it is so hard for me haha
anyways if theres any tips that would be awesome! thanks a bunch-vanessa
Hi Vanessa! Make sure you double the the chart, so make two of each strip and tape them together.
Such a cute idea!!
Thank you, Joann!! XOXO
This is such a cute craft! I just tested it out and found the whole “medallion” step quite confusing. A video or more explicit instructions on that part would be very helpful!
Hi Paula, thank you! Once you have the two pieces of paper together, you now have a circle. Gently bring the center together by pushing down (it doesn’t matter which side you push). It will naturally form the medallion. With one hand hold the medallion together. With the other hand, dab hot glue in the center. Place the hot glue gun down and hold the medallion together with both hands for a few seconds until the hot glue dries. Viola! You have a medallion. I hope this helps!
Thanks for your clarification, Dinah! I figured out that I was making my accordian folds too large so the paper wasn’t wanting to naturally go into the medallion. Once I made the folds about 1 cm wide, everything came together much easier.
Some recommendations I have for other teachers or group leaders planning to do this activity with children: 1. a second set of adult hands would really be helpful; 2. the hot glue takes a lot longer to dry than my students have patience to wait. I will have to glue AND hold the medallions until they dry. My students just don’t have the fine motor skills for this.
Therefore, I’m going to do this activity over three days with my class. On Day 1, we will fold and tape all of the strips. After school, I will hot glue all of the medallions. On Day 2, we will assemble all of the pieces together into the pumpkins. I will apply the hot glue and the students can hold the pieces together until they dry. On Day 3, we will add stems and leaves, which I will glue and let the students hold together until dry. I’m very excited to do this cute craft with my class. I know they are going to love it!
Awesome! Great modifications. I’m so glad you like it and I’m very humbled and honored that you are doing it in class!! Thanks again, Paula!
This is missing lots of information to make these. The size that you suggest for cutting the strips doesn’t not lend its self to being pushed down to form the medallion. You should make a video so that I am convinced that this can be done…because hot glue gun burns latter and I have a big mess…..no pumpkins. Make a video!!! Please
Hi Brooke! So sorry you are having trouble. I’ve made many of these and the instructions should work. Maybe you can explain in detail what trouble you are having and I can try to help? Let me know!
Super cute dinah! I have to get ready for fall, so your tutorial found me at the right time! I wonder if i could get my kids involved…. – maybe they could draw on the paper before using it? What do you think!
Hi Adri! Awesome! Depending on the age of your kids, I think they would be able to make their own! Drawing or coloring the paper would be fun too!
what size are you making the accordian score lines? ie distance between valley and fold?
Hi Amy, I didn’t measure but I would guess about 7/8 inch.
Seriously terrible instructions
Hey Erica, Thanks for the feedback. I encourage both positive and negative so that I can make sure this post is clear and easy to do. What are you having problems with? Maybe I can help. Let me know.
My layers are all pretty much the same size…thoughts?
Hi Nikki! Did you tape the two lengths together? That part is easily missed sometimes.
Mine are too, Nikki. I find that the medallions don’t stack well, and the final product looks more like a pineapple.
Hi Becky! I ended up making better directions in the Christmas version. People were getting confused because of the photo instructions. Here is a better tutorial: https://diyinspired.com/diy-paper-christmas-ornaments/ I hope this helps!
Hi Dinah. Thanks for sharing your lovely paper pumpkins tutorial. Our readers will enjoy it. I’ve included your post in our Top 10 Halloween Crafts roundup. https://craftylikegranny.com/halloween-crafts/ Cheers Jodie 🙂
Thanks, Jodie!
I cut all my strips to the measurements you gave. I was unable to make the 9″ and 7″ strips into the medallion forms. My tape either broke away or I was unable to flatten. Looks more like a teepee. I followed all instructions. Just wondering what I was missing.
Hi Carrie! Did you make 2 strips of the 7 and 9? I ended up making better directions in the Christmas version. People were getting confused because of the photo instructions. Here is a better tutorial: https://diyinspired.com/diy-paper-christmas-ornaments/ I hope this helps!
This was not an easy project. The medallion instructions are not clear. My granddaughter & I gave up. I’m glad we used scrap paper. They are cute like you have them but just didn’t come together like your instructions–maybe a video would have been better. Thank you though.
Hi Ginger! So sorry you and your granddaughter had a tough time. I ended up writing better instructions in this Christmas version. Maybe try these: https://diyinspired.com/diy-paper-christmas-ornaments/
These are so cute. I included a link in my post about Autumn Activities for Kids. My kiddos will love making them for their bedrooms and around the house. Thank you!
Thank you so much, Marielle!
These are cute, but I had some similar problems to other commenters. Mine ended up looking more like apples or pineapples as the different length circles didn’t result in different widths once turned into medallions. On my third one I decided to cut the 7 inch strips into only about an inch width, and the 9 inch strips into only about 1.25 inch width. That helped make it have a slightly more pumpkin-y shape, but then I didn’t push the layers together enough and it still looks too tall, ha. Love this idea, but maybe I need more craft practice. I’m also very impressed and envious of your hot glue skills – you can definitely see all of my hot glue drops 😉 Maybe it’s because my hot glue gun is from the dollar store? Or maybe it’s just me! Anyway, thanks for the craft idea!
I’m sorry it didn’t work out. I’m honored that you tried it! Thanks so much, Katie.
When I accordion fold, the folds seem to go off to one side, not lining up by the end of the strip. I’m trying to do them as evenly as possible.
Hi Sue! It’s OK if it is not even. It will still work.
It is impossible to push the 7×1.5 strip into an a medallion
I trimmed a bit off and it worked but still looks too small on top.
I’ll try an 8×1.25” strip
thank you sooo much for sharing these cute pumpkins, they turned out so well !!!
Great!!! So happy it worked well for you!
Easy to follow directions! Thank you 4 taking the time to share these paper pumpkins. I tweaked the measurements a little bit so i have about 3 different sizes. They came out so adorable! My 4 yr old wants me to make enough for a paper pumpkin patch! We numbered the bottom of each pumpkin 1 – 10 ( 2 times so you have 20 all together) now we have a match/ memory game, who ever has the most pairs wins candy! This entertained my daughter 4 the entire day/ eve she couldnt wait 2 show her Daddy. We had Lots of fun! Again THANK YOU 4 SHARING!
Wow!!! That’s fantastic!! I love it. Thanks for taking the time to share that with me. So glad you liked the tutorial.
thank you sooo much for sharing these cute pumpkins, they turned out so wel
Wonderful!!! have a great Thanksgiving and Happy holidays!
These are adorable! Sure wish I was crafty! Hubby and I spent more than hour trying this craft a few times. We laughed and were proud of us old folks for trying but no pumpkins. Yours are so cute :0)
Ha!! Thank you SO much!!
Since each strip is 1.5 inches, the resulting circles will all be 3 inches in diameter; you cannot get a circular pumpkin. Like my Granddaughter said, it looks more like an orange banana.
You need to make the longest strips wider than the shorter ones:
7″ x 1.0″
9″ x 1.5″
11″ x 2.5″
11″ x 2.5″
9″ x 1.0″
That fits nicely on a standard 8.5 x 11 piece of paper.
Thanks,
Nathanael (aka Bompa)