How to Tie Dye Shirts
An Easy Tutorial for How to Tie Dye Shirts Plus 4 More Design Ideas
It has literally been over 30 years since I tie dyed a t shirt. But one thing is for sure, I haven’t forgotten how to! My 6 YO daughter asked me how to tie dye shirts, so thanks to her, I am sharing this old school throwback but with new school products.
Time: 30-40 minutes (plus set, wash, and dry time)
Materials:
This materials list contains affiliate links for recommended products I use.
Note: We used the Tulip mini tie dye kit , but here is the complete list of materials.
- Dye
- Protective Gloves
- Rubber Bands
- Bucket
- Scissors
- Plastic Wrap or Plastic Bag
- Plastic Tablecloth (optional)
Watch the Video:
Instructions:
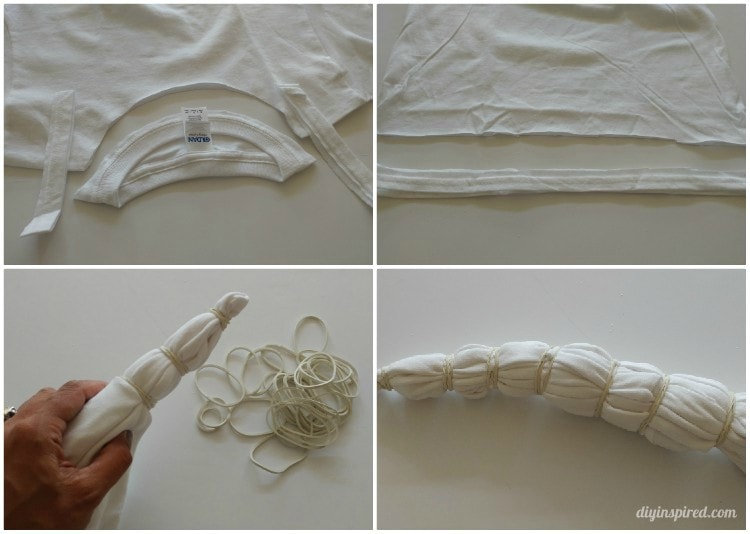
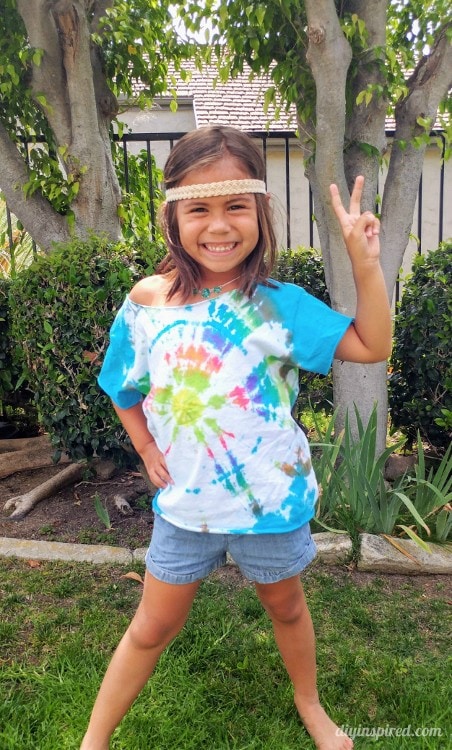
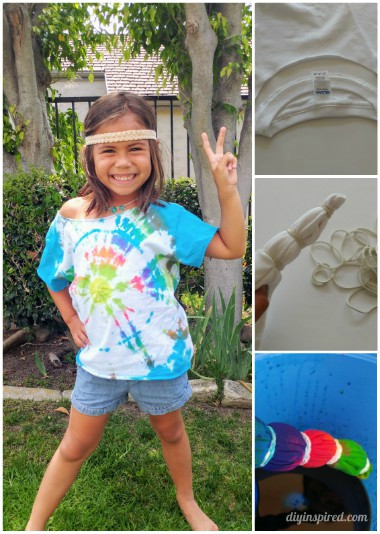
To prep, wash and your t shirt and protect your surface with a plastic table cloth. You can tie dye the shirt wet or dry. I wanted to cut it, so this shirt is dry in this tutorial. I cut the shirt to make it off the shoulder by trimming the neck, sleeves, and bottom. Next, I pinched the material in the center of the shirt and pulled upwards, tying rubber bands about an inch or two apart.
Wearing protective gloves, add the die in the desired colors in each section of the shirt. Since we used the tie dye kit, we used squeeze bottles to apply the dye. Make sure the die penetrates through the fabric but try not to over saturate it.

Once you are finished applying the dye, keep the rubber bands on and wrap the shirt in plastic wrap or place it in a tightly sealed Ziploc bag. Allow the dye to set for 8 or more hours. We left ours overnight. The longer you set it, the more vibrant the colors. Once the dye is set, rinse the dye off until the water runs clear. Make sure you wear your gloves. Wash the t shirt in the washer in hot water by itself. You may need to run another rinse cycle after washing the shirt. Dry the shirt separately as well.
Here is the finished product.
Other Tie Die Design Techniques
Here are a few fun techniques you can try.
- Bullseye – shown in this tutorial
- Spiral – Pinch the fabric and twist in a flat spiral. Bind with rubber bands in a pie shape applying the colors in each “slice of pie”.
- Stripes – Pleat the damp fabric in strips and bind into sections. Dye alternate colors in each section.
- Crumple – crumple a damp T shirt in a round mound then add dye. Flip it over to dye the back side. Use different amounts of color as you choose. Play around with colors and splashing techniques.
- Astro Pop Inspired- scrunch a damp shirt into a tube shape and separate in three areas with a rubber band. Use red dye in the first area and then blue dye in the 3rd area.
Like it? Pin it!
You May Also Like: