DIY Monogram Swarovski Pearls in a Frame
I am so excited to have Heather guest post today from Rockstew! She is sharing her DIY Monogram Swarovski Pearls in a Frame Tutorial. Not only does Heather blog about crafty DIY, she also shares parenting tips, recipes, favorite books, and adventures in raising her daughter, Annabelle. You can follow her on Facebook, Twitter, and Pinterest. Here is Heather’s DIY Monogram Swarovski Pearls in a Frame Tutorial. Welcome, Heather!

I’ve been obsessed by Pinterest and also monograms for the past month. So I decided to make baby girl a lovely monogram using Swarovski pearls. I chose the pearls instead of crystals because baby girl was born in June and pearls just happen to be her birth stone.
This year, my resolution is to use only things I have in the house or material that is upcycled. Because of my jewelry company that I no longer run, I still have lots of Swarovski crystals and pearls lying in a box unused in the back of my closet.
Time: 6-7 hours
Skill: Easy to Moderate
Ingredients:
- Frame (without glass)
- Size: 15×13 on the outside perimeter. 9 1/2″ by 7 1/2″on the interior perimeter
- I bought the above frame without glass or a back at a thrift store for $3.99
- Swatch of linen
- I bought a linen tablecloth at thrift store for $1.99
- Transfer Paper
- Purchased at Fabric Store $4.99
- Swarovski Pearls

- approx. 250 3mm Cream Rose Crystal Pearl
- approx. 20 4mm Cream Rose Crystal Pearl
- Cardboard (if the frame has no back)
- Embroidery Hoop *optional
- Tape


 *optional
Steps
*These are the exact steps I took using the materials that I had as listed above. Please modify if needed!
Step One: The frame I purchased had no glass or back, so I improvised a backing using cardboard. I cut a piece of the cardboard to match the backing of the frame. Using the cardboard “backing” piece, I cut out a swatch of fabric that was large enough for me to fold down the edges securely in the back.
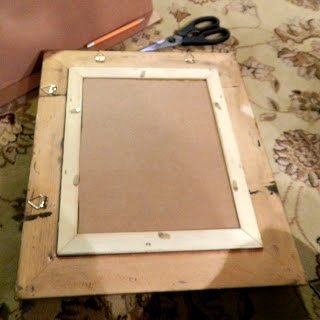
{Created a cardboard backing}
Step Two: I tea dyed the fabric by soaking the fabric overnight in 8 bags of black tea. 24 hours later, I washed and dried the fabric in the washing machines/dryer then ironed the fabric.
Step Three: On the computer, open up Paintbrush. Using the font LUKE, I selected the text tool and placed in the A. I could have measured but I eyeballed the appropriate size by holding up the frame next to the computer. It was approximately 375 pt. font.
Step Four: Place the transfer paper in your printer. Before printing, read the instructions of Transfer Paper. The directions on the package indicated to print the image in a mirror copy. I did NOT do that because I wanted the letter A to be on the back as a guide only. (If the image is on the back, it needs to be backwards so that you can trace it properly.) If you want this project to be cheaper/more environmental, I would recommend tracing the letter on the back of your fabric. Iron the letter onto your fabric.
Step Five: Next, get out the embroidery hoop and center the fabric. Be sure that the A is showing from the back of your hoop. (It’s not necessary to use an embroidery hoop, but it makes this project much easier.)
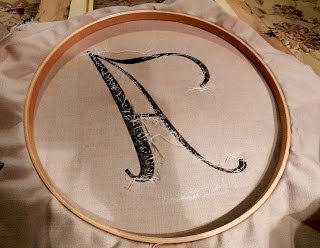
Step Six: Double thread your needle and knot it. From the back, pull your needle through the fabric. Holding the needle, drop a Swarovski pearl through the needle, and then gently pull the needle up.

{Sewing Swarovski Pearls onto linen background}
Step Seven: To secure the pearl, push the needle through the fabric in approximately the same place that you came up. The pearl will center above this entry/exit. Continue “sewing” your pearls to the fabric until you are finished. Use a variety of sizes to create a variegated look.
Step Eight: Once you are finished, loosen the fabric from the embroidery hoop. Iron the fabric where the embroidery hoop has creased the fabric.
Step Nne: Center the fabric over the cardboard and secure the edges to the back using tape.
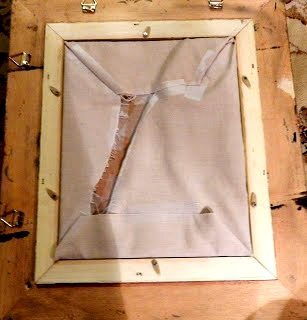
{Taped linen to cardboard backing}
Step Ten: Place the cardboard into the frame and secure. I placed a secondary piece of cardboard over the top to hide the mess, but this is not a necessary step.
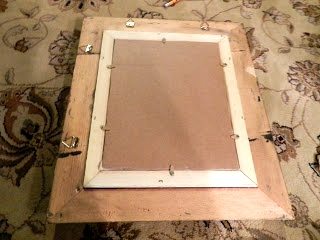
{Secondary cardboard}
{Voila! Pearl Monogram}
What a simple craft idea that looks extra-special when finished!