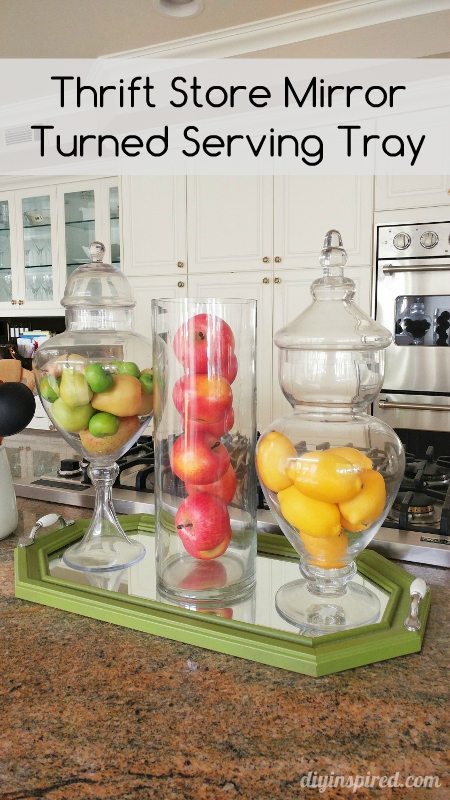
DIY Serving Tray: A Mirror Makeover
How to Make a DIY Serving Tray Plus Tips for Thrift Store Hunting
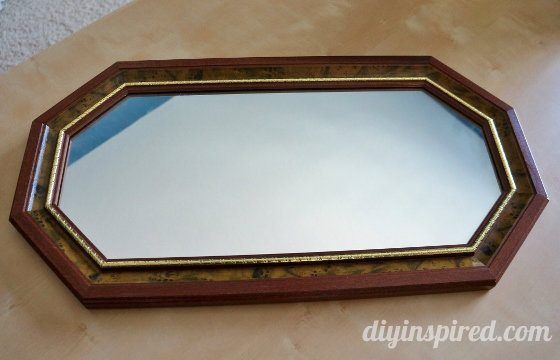
I have had some great luck on my thrift store outings. Can you believe I have saved hundreds of dollars on wall mirrors? I found this great mirror for five dollars at a local thrift store the same day I bought my $5 shelf that I refurbished. I loved the long hexagonal shape and immediately thought I would repurpose it and make the perfect DIY serving tray for entertaining. Here’s a photo of my great find! The style is questionable but I could see right past its outdated tackiness!
Thrift Store Tips: Keep these tips in mind on your hunt for treasure!
- Don’t pay attention to color, rather shape and size.
- Look at the back, can the mirror or glass to be easily removed?
- Check the material. Is it plastic? Wood?
- Is there any damage? Can it be easily fixed?
- Sometimes thrift stores are a great resource for hardware. You may have to buy the entire piece, but it is potentially less expensive than purchasing the hardware new.
Time: 30 Minutes
Materials: This list has some recommended supplies from Amazon that are my affiliate links.
- Mirror
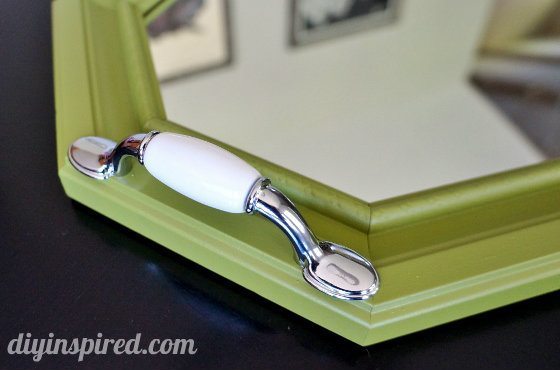
- Two cabinet handles (I chose 3”)
- Spray paint
- Newspaper
- Painter’s Tape

- Screwdriver
- Ruler
- Sharpie
- Drill
- Scissors


Instructions:
Step One:
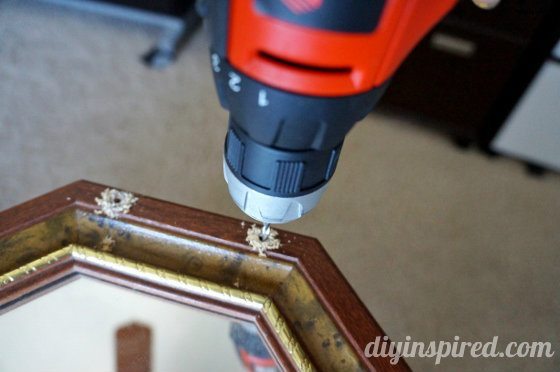
Using a ruler and Sharpie, measure where your handles will be drilled. A Sharpie works great because it’s dark, plus you will paint over it so there is no need to worry about the marks.
Step Two:
Drill the holes for your cabinet handles and remove any picture frame hardware from the back. If it is not removed, the hardware can scratch your tabletop or countertop.
Step Three:
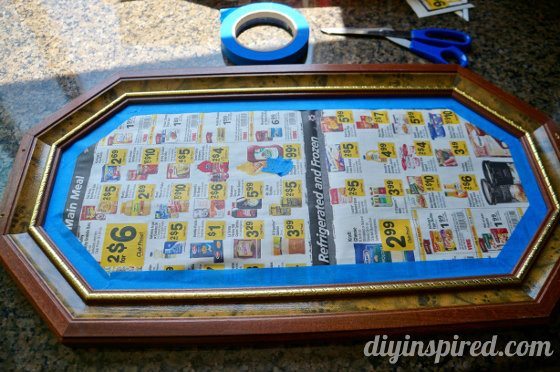
Protect the mirror by covering it with newspaper and securing it with painter’s tape.
Step Four:
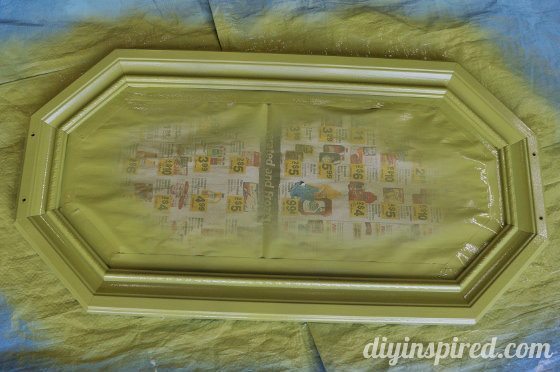
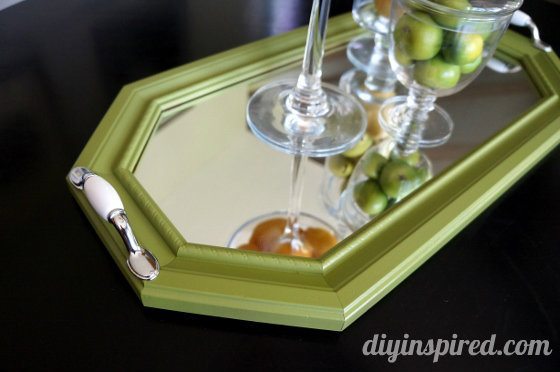
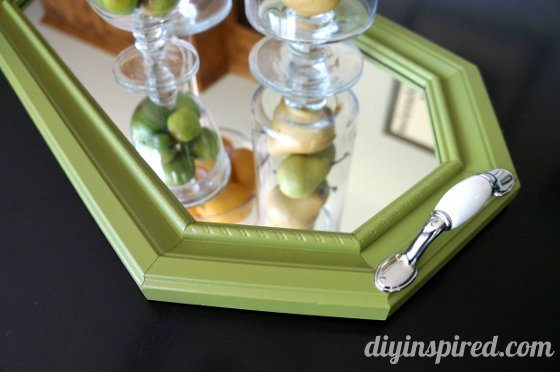
Spray paint your tray in the color of choice in a well-ventilated area and allow it to dry completely. I decided to paint it my favorite color… GREEN!
Step Five:
Once the paint is dry, attach your handles with a screwdriver. If you choose, cover the screw heads with a small piece of felt to prevent scratching any surfaces.
Here are a few after pictures. I just love it! I keep it out in the kitchen at all times and use it for a display with my apothecary jars. I change out the contents of the jars depending on the holiday or season. Green also seemed to be a good choice as well as it works all year around.
For more repurposing ideas and trash to treasure ideas, check out this fun round-up of garage sale and thrift store transformations! There are over two dozen original projects I have done including housewares and furniture transformations. I told you I love the hunt!
Update: I have officially had this serving tray mirror for four years! I originally wrote this post in May of 2013. It is still in great condition and I see it everyday in my kitchen. Since then I have also done this fun thrift store tray makeover that I use in my bedroom everyday. Check it out!
Like it? Pin it!


Great Site! Found you on Top Mom Blogs. http://www.babydashco.com
Thank you so much for stopping by Kathryn! On my way to your site!
Beautiful!
Thank you as always Irene!!!!
I love it!
Thank you, Loren! P.S. My photos are getting better too… tee hee…Hope you’re doing well!!!
Oh that is so pretty, Dinah!
Thank you so much, Tara! I loved doing this one!
Dinah, I wish i had your talent! I can’t see things finished the way that you do. You inspire me! :0)
You are so kind, Diana! Thank you so much! That means a lot to me!!!
This is such a neat idea. I would’ve never envisioned that an outdated mirror can look so stylish. I wish I have the space to try all this out.
Thank you, Ming! You could always try hand painting it. That way you don’t have to worry about a place for spray painting and fumes. 😉
Great re-purpose & love the results.
Thank you so much, Theresa!
I love it! Now I gotta make one! 🙂
Thank you so much, Susie!!
Thank you so much, Susie!!
Oh how pretty this turned out! What a great, thrifty idea!
Thank you so much, Lisa!
This came out so beautiful! I just inherited a similar style mirror and I’d love to try this with it.
Thank you, Danielle! I love it. I have used it so many times.
Very nice idea you give for the mirror you convert it into serving tray and its such a great tutorial that you shared.
Hello! I’d like to know what kind of paint are you using?
Hi Berit! I really should have included it! I’m not exactly sure but likely I used the Krylon ColorMaster Enamel Spray Paint. I used that for most of my projects like this. It works very well.
How does it stand scratches and such? I have a wooden dinner table that’s paint needs to be refreshed, but i haven’t figured out wether i should use a brush, if so which paint or something sprayable. Im quite a n00b at this 🙂
I painted this table with a paint brush: https://diyinspired.com/refurbishing-furniture-a-thrift-store-makeover/. I recommend sanding the table first, then applying two coats of primer. Let the primer dry overnight. You can then spot sand any bumps or blemishes. I would paint the table top with a roller brush and then use a regular bristle brush for the rest. When choosing your paint, use a water-based enamel paint. After you paint it and it is dried completely, paint a coat of polyurethane on top to help protect it. I hope this helps! Let me know if you have any other questions. I would love to see a before and after photo!! dwulf@diyinspired.com
Another question about sanding – do you sand the old paint completely off or just the places where the old paint is cracked or scratched to make it smooth?
I’ll try and not get carried away once i get the time to do it and take some photos as well 🙂
Thanks for the info!
You’re welcome! I use an electric sander to try and get off as much paint as possible.
I just saw this in a Sunday link up at a Table for two and said I think I have seen that before…. came over & yep! I have…. I knew it had to be you!
Love your DIY tray Dinah. The color you painted it is so fresh.
Thank you, Marie! I love green!
Great makeover! Thanks so much for linking this up at Best of the Weekend!
Thank YOU and thanks for having me!
What a lovely way to repurpose that mirror! Love this project…pinning and sharing! Thanks for linking it up with us at #FoodieFriDIY!